When your QuickBooks balance doesn’t match your bank balance, the difference usually comes from transactions that have not been recorded, matched, cleared, or reconciled correctly. It can also happen because of duplicate entries, outstanding transactions, an incorrect opening balance, or changes made to previously reconciled transactions.
The first step is not to force the balances to match with an adjustment. Instead, compare the bank statement with the QuickBooks account register and identify exactly where the difference began. QuickBooks recommends having the relevant bank statement available and ensuring transactions for the statement period have been added and categorized before reconciliation.
What the QuickBooks Balance and Bank Balance Actually Represent
A balance mismatch can be confusing because the two figures may be calculated from different sets of information. The QuickBooks balance reflects transactions recorded in the QuickBooks account register. The bank balance associated with a connected account is based on information received from the financial institution. Transactions waiting to be reviewed, outstanding transactions, or activity that has not yet been recorded in the register can therefore create a difference.
For example, suppose your bank shows $8,500 while the QuickBooks account shows $8,150. The $350 difference does not automatically mean QuickBooks is wrong. There could be a pending transaction, an uncleared check, a missing deposit, or another legitimate timing difference. Before making corrections, determine what each balance includes and what date you are comparing.
How Do I Find the Cause of a Mismatch Between My Bank Balance and QuickBooks Totals?
When your bank balance and QuickBooks totals don’t match, you can usually find the cause by tracing the difference from your last correct reconciliation. Instead of changing the balance immediately, work through these steps to identify the transaction responsible.
1. Start With the Last Correct Reconciliation: Find the most recent reconciliation where the QuickBooks balance matched your bank statement.
- Statement ending date
- Statement ending balance
- Reconciled balance
- Account you reconciled
This gives you a reliable starting point for finding when the mismatch began.
2. Compare Transactions From That Date Forward: Review the QuickBooks account register and compare it with your bank statements from the last correct reconciliation onward.
Look for transactions that are:
- Missing from QuickBooks
- Missing from the bank statement
- Entered more than once
- Recorded for the wrong amount
- Dated incorrectly
- Posted to the wrong account
The first transaction that doesn’t agree with the bank records can often point you directly to the source of the mismatch.
3. Check Outstanding Transactions: Look for checks, payments, deposits, or transfers that have been recorded in QuickBooks but haven’t appeared on the bank statement yet. These transactions may create a temporary difference and don’t necessarily mean something is wrong with your books.
4. Review Recently Changed Transactions: If the account previously reconciled correctly, check whether someone recently edited, deleted, moved, or unreconciled a transaction. A change to a previously reconciled transaction can affect the reconciliation and cause the current QuickBooks totals to differ from what you expect.
5. Check the Beginning Balance: If the mismatch appears when you start a reconciliation, compare the beginning balance with the ending balance from the previous completed reconciliation. If those numbers don’t agree, investigate the earlier reconciliation rather than simply changing the beginning balance.
6. Check Bank Feed Transactions: If you’re using a connected bank account, review transactions waiting for review. Make sure downloaded transactions have been matched to existing QuickBooks entries when appropriate. Adding a transaction that already exists can create a duplicate and increase the balance difference.
7. Identify the First Transaction That Explains the Difference: Once you’ve compared the records, focus on the first transaction that accounts for the difference. For example, if QuickBooks is $500 higher than the bank and you find a $500 deposit recorded in QuickBooks that never appeared on the bank statement, you’ve likely found the reason for the mismatch. Correct the underlying transaction only after verifying it against the bank records.
8. Reconcile Again After Correcting the Cause: After fixing the confirmed error, return to the reconciliation and compare the account with the actual bank statement. The goal isn’t simply to make the numbers match. The goal is to understand why they were different and correct the transaction or timing difference responsible for it. Avoid entering a generic adjustment just to force the reconciliation to zero. An unexplained adjustment can make future reconciliations and financial reports less reliable.
How to Fix a QuickBooks Balance Mismatch Step by Step
When your bank balance doesn’t match the QuickBooks balance, don’t rush to enter an adjustment. In most cases, you can find the difference by comparing the account activity carefully and tracing the mismatch back to a specific transaction.
1. Compare the Correct Dates
Start by making sure you’re comparing balances for the same date and the same account. A simple date mismatch can make two correct balances look different.
Check the:
- Bank statement ending date
- QuickBooks transaction dates
- Date of the last completed reconciliation
- Current reconciliation period
- Correct bank or credit card account
If you have several accounts at the same bank, double-check the account before reviewing individual transactions.
2. Review the QuickBooks Account Register
Next, open the affected account and go through its transaction history. Look for anything that could explain the difference.
Pay particular attention to:
- Duplicate transactions
- Missing deposits
- Missing payments or withdrawals
- Incorrect transaction dates
- Unusual amounts
- Unexpected transfers
- Transactions posted to the wrong account
Don’t delete or edit a transaction just because it looks unfamiliar. Compare it with your bank statement first so you don’t create another accounting problem while trying to fix the original one.
3. Compare QuickBooks With Your Bank Statement
The most reliable way to locate a mismatch is to compare the QuickBooks register with the bank statement for the same period. Work through the statement one transaction at a time and mark each item that appears in both records. Then investigate anything that appears on only one side.
| What you find | What it may indicate |
| Bank transaction missing from QuickBooks | Missing transaction |
| Same transaction appears twice | Duplicate entry |
| QuickBooks transaction isn’t on the statement | Outstanding or uncleared transaction |
| Transaction amounts are different | Incorrect entry |
| Previously reconciled transaction was changed | Reconciliation discrepancy |
| Beginning balance doesn’t agree | Opening or beginning balance issue |
This method is much safer than making a general balance adjustment because you’re correcting the transaction that caused the problem rather than hiding the difference.
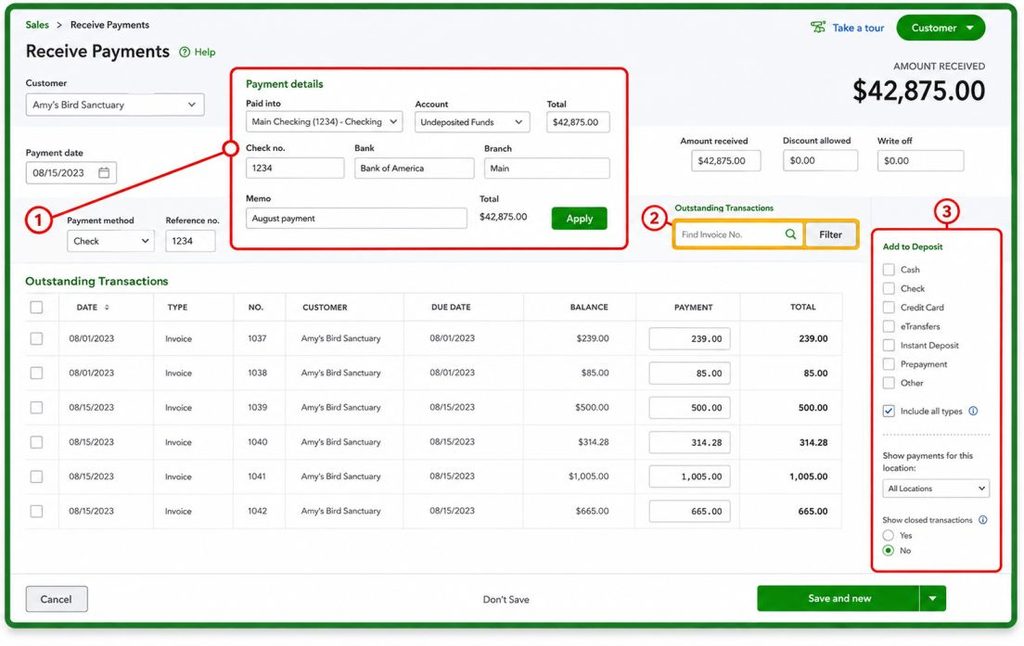
4. Review Bank Feed Transactions
If the account is connected to online banking, check the transactions waiting for review.
A downloaded transaction may need to be matched to an existing QuickBooks transaction rather than added as a new transaction. Manually adding a transaction that already exists can create a duplicate.
QuickBooks specifically recommends matching and categorizing downloaded transactions before reconciliation.
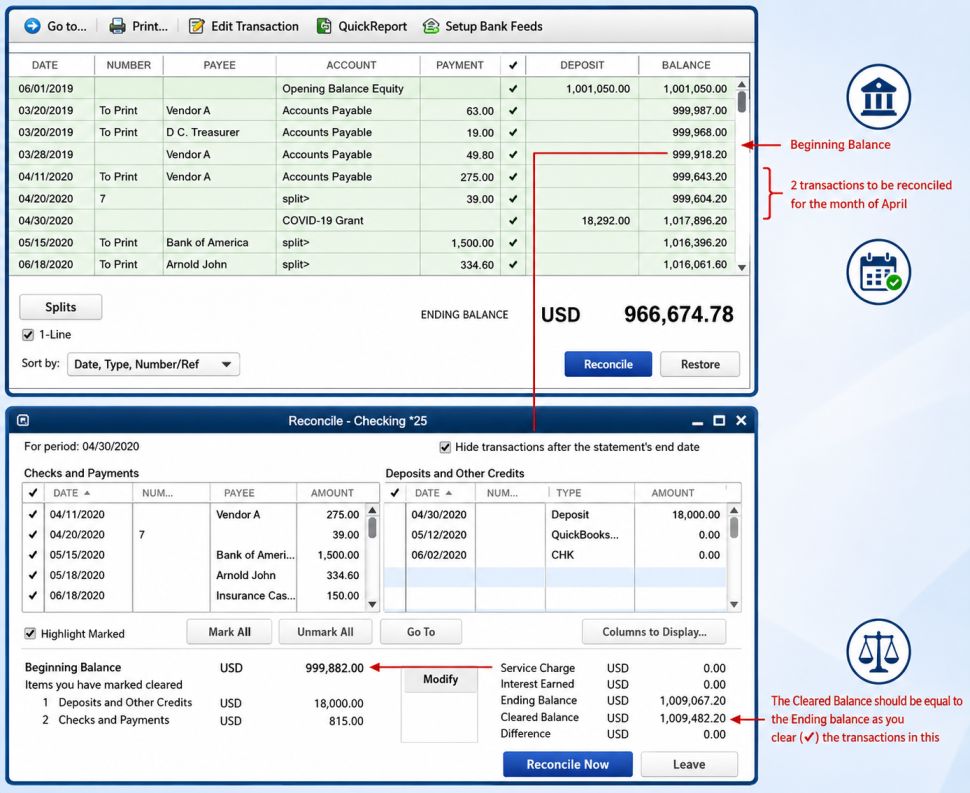
5. Check the Beginning Balance
If you see a beginning balance error in QuickBooks, compare the beginning balance with the ending balance from your previous completed reconciliation.
If the account has never been reconciled before, check the original opening balance against your bank records. QuickBooks explains that the opening balance establishes the starting point for the account, and an incorrect opening balance can affect the first reconciliation.
If the account has been reconciled before, investigate changes to earlier reconciled transactions instead.
6. Review the Reconciliation Discrepancy Report
If the account reconciled correctly in the past but no longer does, review the reconciliation discrepancy information available in QuickBooks.
This can help you identify transactions that were changed after a previous reconciliation. For example, someone with access to the company file may have edited an amount, changed an account, deleted a transaction, or altered its reconciliation status.
Review each reported change carefully. If the change was intentional, determine whether the previous reconciliation or related records also need to be reviewed.
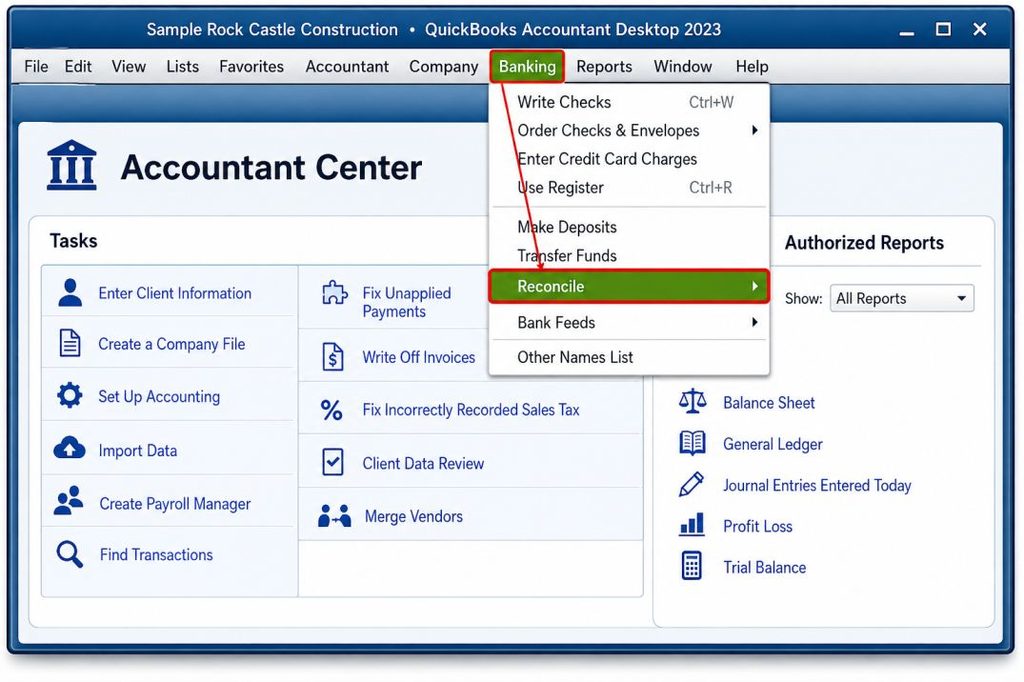
7. Reconcile the Account Again
After you’ve identified and corrected the underlying issue, return to the reconciliation process and compare the account with the actual bank statement.
Verify the:
- Statement ending date
- Statement ending balance
- Transactions included in the statement period
- Cleared transactions
- Reconciliation difference
Your goal is to understand why the difference exists and bring the reconciliation difference to $0.00 before completing the reconciliation. Most importantly, don’t change the bank statement ending balance just to make QuickBooks reach zero. Enter the ending balance exactly as it appears on the actual statement. If the difference remains, stop and investigate it rather than creating an unexplained adjustment. A small unexplained adjustment today can make future reconciliations and financial reports harder to trust.
Fixing Common Reconciliation Errors
If your QuickBooks reconciliation still doesn’t agree after you’ve compared the transactions, check these common issues before making any balance adjustment.
1. Incorrect Opening Balance: If the beginning balance doesn’t agree with your previous reconciliation, review the account’s opening balance and the transactions that were entered before the reconciliation period. Don’t simply change the beginning balance to force the reconciliation to match.
2. Deleted or Modified Reconciled Transactions: A transaction that was changed or deleted after reconciliation can affect a previously reconciled balance. Review the account’s reconciliation history and available discrepancy information to determine whether a previously reconciled transaction was changed.
3. Missing Transactions: If a transaction appears on your bank statement but isn’t recorded in QuickBooks, enter or record the transaction using the correct transaction type and details. Then include it in the appropriate reconciliation period.
Note: Before correcting any of these issues, verify the transaction against the bank statement and your accounting records. The safest approach is to correct the underlying cause rather than use an unexplained adjustment to make the reconciliation balance.
What If the Bank Balance Is Not Updating in QuickBooks?
If your bank balance is not updating in QuickBooks, first determine whether new banking activity has reached QuickBooks.
1. Check the Latest Downloaded Activity: Look at the bank-feed area and determine when transactions were last downloaded. Compare that activity with your bank’s current records.
2. Review Transactions Waiting for Review: Check whether new transactions are sitting in the bank feed waiting to be reviewed. A transaction that has already been entered in QuickBooks may need to be matched rather than added as a new transaction. Adding it again can create a duplicate.
3. Confirm the Correct Account: Make sure the connected bank account is the same account you’re reviewing in QuickBooks. This is especially important if you have multiple accounts at the same financial institution.
4. Compare Recent Bank Activity: If a transaction appears at the bank but isn’t appearing in QuickBooks, compare the dates and latest downloaded activity. This helps determine whether you’re dealing with a delayed download or an issue that needs further investigation.
5. Check the QuickBooks Register: If the transaction has already reached QuickBooks but the balance still appears incorrect, open the account register and check how the transaction was recorded.
The displayed balance should not be treated as proof that a particular transaction is missing. Always verify the underlying account activity.
When You Should Avoid a QuickBooks Balance Adjustment
A balance adjustment can make a mismatch disappear, but it doesn’t necessarily fix the reason the mismatch happened.
1. Find the Cause First: Before entering an adjustment, review the account register, bank statement, reconciliation history, and relevant transactions. If you can identify the transaction responsible for the difference, correcting that transaction is generally more informative than hiding the difference with an unexplained adjustment.
2. Be Careful With Historical Reconciliations: If the mismatch involves a previously completed reconciliation, don’t change historical transactions casually. A correction can affect earlier financial records and subsequent reconciliation balances. Review the reconciliation history and understand the effect of the change before proceeding.
3. Don’t Force the Balance to Match: The purpose of reconciliation is to confirm that the recorded transactions agree with the financial institution’s statement for the relevant period. If you cannot explain the difference, it’s better to investigate it further than to enter an adjustment simply to make the numbers match.
If the correction could affect important financial statements or you’re unsure how to handle a historical accounting change, consider having an accountant or qualified bookkeeper review it.
How to Keep QuickBooks Balances Accurate and Prevent Future Discrepancies
Once you’ve fixed a QuickBooks balance mismatch, the next step is to reduce the chance of the same problem happening again. A consistent reconciliation routine, timely transaction entry, and careful review of bank-feed activity can help you catch differences before they become difficult to trace.
- Reconcile Accounts Regularly: Reconcile your bank and credit card accounts regularly using the statements from your financial institution. Regular reconciliation makes it easier to spot missing transactions, duplicate entries, and other differences while the related records are still easy to verify.
- Record Transactions Without Unnecessary Delays: Keep QuickBooks updated as transactions occur, particularly for deposits, payments, expenses, and transfers. Recording activity promptly gives you a more current view of the account and makes later comparisons with your bank records easier.
- Match Bank Feed Transactions Correctly: When a downloaded bank transaction matches an entry that is already recorded in QuickBooks, match it with the existing transaction instead of adding another one. This helps prevent duplicate entries and keeps the account register accurate.
- Review Previous Reconciliations: Periodically review your reconciliation history, especially when more than one person has access to the QuickBooks company file. Changes to transactions that were previously reconciled can affect later balances, so investigating unexpected changes early can prevent larger reconciliation problems.
- Keep Bank Statements and Supporting Records: Keep your bank statements and relevant transaction records available for reference. If a discrepancy appears, these records give you a reliable source for checking transaction dates, amounts, and account activity instead of relying only on the balance displayed in QuickBooks. Good bookkeeping practices cannot eliminate every balance difference, but they can make discrepancies easier to detect, explain, and correct before they affect future reconciliations.
Conclusion
A QuickBooks balance mismatch doesn’t always mean your books are incorrect. The difference may come from a missing transaction, duplicate entry, outstanding activity, an incorrect beginning balance, or a change made after reconciliation.
The best approach is to compare QuickBooks with the correct bank statement, trace the difference back to its source, and correct the underlying issue instead of forcing the balances to match with an unexplained adjustment. Once the account is accurate, regular reconciliation and careful transaction management can make future discrepancies much easier to spot and resolve. By focusing on why the balances differ, rather than simply making the numbers agree, you can keep your QuickBooks records more accurate and easier to rely on.
Frequently Asked Questions
To correct an incorrect bank balance in QuickBooks Online, you should review and fix any beginning balance or reconciliation discrepancies, then re-reconcile the account. QuickBooks has tools to help you find issues when your beginning balance doesn’t match your bank statement. You can use the beginning balance discrepancy report or re-enter correct values. Often this involves verifying the ending balance from your last reconciliation and ensuring transactions are recorded accurately before reconciling again.
A negative bank balance in QuickBooks typically means that more payments or withdrawals have been recorded than deposits, indicating an overdraft situation or misentered transactions. This can also occur if opening or beginning balances were entered incorrectly or if liability/credit card accounts display negative by design due to accounting treatment.
If your beginning balance doesn’t match the bank statement, QuickBooks will show an alert. The usual solutions include:
1. Reviewing opening balance entries (especially if it was entered incorrectly originally).
2. Using QuickBooks’ reconciliation discrepancy report to track down edited, deleted, or unreconciled transactions affecting the beginning balance.
3. Correcting or recreating those transactions in the register and then reconciling again.
Fixing beginning balance issues allows the reconciliation to proceed correctly.
In QuickBooks Online, matching transactions means linking downloaded bank feed transactions to existing entries in your books. QuickBooks will suggest matches when amounts, dates, or descriptions align. You can:
1. Go to the Banking (or Transactions) page.
2. Look for a downloaded item where QuickBooks shows “Match” suggested.
3. Select the suggested match and confirm to link it.
4. If QuickBooks doesn’t automatically find a match, you can use the Find Match tool to pick the correct transaction manually.
This ensures your bank transactions are properly recorded in your QuickBooks register.
The register balance in QuickBooks is the running total of all transactions recorded in that bank or credit card account in your books. It reflects the balance based on entries in QuickBooks (cleared and uncleared), not the real-time balance from your bank’s system. The register balance should tie to the balance shown on your reconciliation reports if all transactions are correctly recorded and reconciled.
To change or edit a beginning balance in QuickBooks Online:
1. Go to the Chart of Accounts and find the account.
2. Click View register for that account.
3. Locate the original opening balance entry (often labeled with an opening balance equity account).
4. Edit the amount to match your actual bank record, then Save.
After editing, check your reconciliation to make sure the new beginning balance now matches your bank statement.