Reconciling an account in QuickBooks Online is the process of comparing the transactions recorded in your books with the activity shown on your bank or credit card statement. When the records agree, you have greater confidence that your account balance, financial reports, and bookkeeping records reflect what actually happened.
If you want to reconcile an account in QuickBooks Online, the most important rule is simple: compare your QuickBooks transactions with the statement for the same period rather than checking transactions just to make the difference disappear. A completed reconciliation should normally end with a $0.00 difference.
This guide explains the current reconciliation process, how to investigate a QuickBooks Online reconciliation difference, what to do when your beginning balance is incorrect, and how to undo or unreconcile transactions when something was recorded incorrectly.
What Does Reconciliation Mean in QuickBooks Online?
QuickBooks Online reconciliation verifies that transactions recorded in an account agree with the corresponding bank or credit card statement.
For example, your bank statement might show a customer deposit, several payments, a bank fee, and a transfer. You compare those entries with the transactions in QuickBooks Online and select the transactions that actually appear on the statement.
Reconciliation can help you identify:
- Missing transactions
- Duplicate entries
- Incorrect transaction amounts
- Transactions recorded in the wrong account
- Bank fees or interest that were not recorded
- Transactions that have not cleared yet
- Changes made to previously reconciled transactions
- Possible suspicious or unauthorized activity
The purpose is not simply to make the numbers match. You want the QuickBooks records to accurately represent the activity shown by the financial institution. Intuit recommends having the account statement available and making sure transactions for the statement period have been added and categorized before you begin.
Why Should You Reconcile Your Accounts Regularly?
If you wait several months before checking an account, it becomes harder to determine when an error occurred. Regular reconciliation gives you a smaller period to investigate and makes unusual transactions easier to identify. A consistent QuickBooks Online bank reconciliation process can help you:
| Benefit | Why it matters |
| Improve record accuracy | Your books can be compared against an independent statement |
| Find missing entries | Bank activity that is absent from QuickBooks becomes easier to spot |
| Identify duplicates | Duplicate deposits or payments can affect your account balance |
| Detect unexpected activity | Unfamiliar transactions can be investigated sooner |
| Support financial reporting | Reconciled accounts provide a stronger basis for reviewing financial statements |
| Simplify bookkeeping reviews | Previous reconciliation reports provide a record of completed reconciliations |
Monthly reconciliation is a practical routine for many businesses because bank and credit card statements are commonly issued monthly. Intuit also recommends reconciling regularly after receiving your statement.
What Do You Need Before You Reconcile in QuickBooks Online?
Before you reconcile bank account in QuickBooks Online, gather the statement for the period you want to reconcile. You should have:
- The bank or credit card statement
- The statement ending date
- The statement ending balance
- Transactions for the statement period recorded in QuickBooks
- Bank-feed transactions reviewed and categorized, when applicable
- Access to the correct QuickBooks Online account
If your bank or credit card account is connected to QuickBooks Online, transactions can be downloaded into QuickBooks. However, downloaded transactions still need to be reviewed and properly matched, categorized, posted, or excluded as appropriate.
- Check the Previous Reconciliation: Before starting, look at the last reconciliation. The current statement should generally begin the day after the previous statement’s ending date. Your QuickBooks Online beginning balance should also agree with the ending balance from the previous reconciliation. If it does not, investigate that issue before continuing.
How to Reconcile an Account in QuickBooks Online
Before starting, have the bank or credit card statement for the period you want to reconcile. Intuit recommends making sure the transactions for that period have been added and categorized in QuickBooks before beginning.
Step 1: Open the Reconcile Page and Select the Account
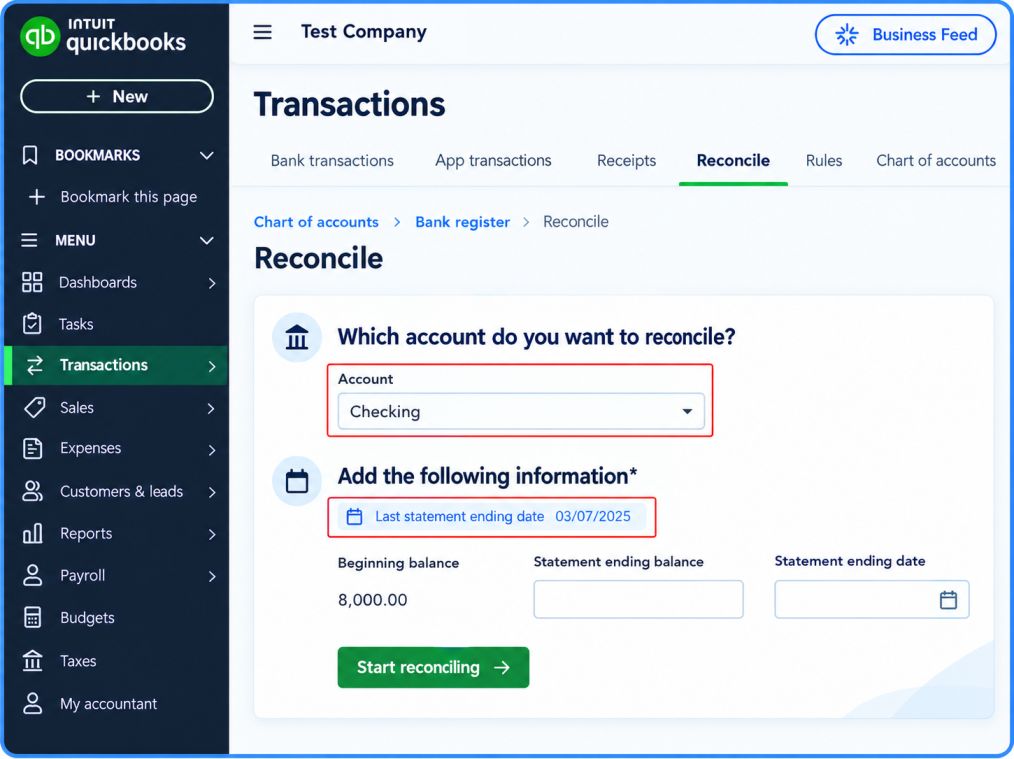
In QuickBooks Online, go to:
All apps → Accounting → Reconcile
If this is your first reconciliation, select Get started. Then choose the bank or credit card account you want to reconcile. Review the Last statement ending date before entering your current statement information.
Your current statement should normally begin on the day after the previous statement’s ending date. If the dates do not follow the expected sequence, stop and investigate before marking transactions as reconciled. This check is important because reconciliation is intended to proceed in chronological periods. Starting with the wrong statement date can make later discrepancies harder to identify.
Step 2: Enter the Statement Ending Balance and Date
Use the physical or electronic statement from your financial institution and enter:
- Ending balance
- Ending date
These values should come directly from the statement rather than from the QuickBooks account register. Intuit’s current workflow specifically instructs users to enter the ending balance and ending date from the account statement before starting the reconciliation.
If you enter an incorrect ending balance, QuickBooks can show a difference even when every transaction has been matched correctly. For that reason, if the reconciliation immediately shows an unexpected difference, verify the statement information before investigating individual transactions.
Step 3: Compare Transactions With the Bank Statement
After selecting Start reconciling, QuickBooks Online displays transactions for the account through the statement ending date. Take the statement and compare each transaction with the corresponding transaction in QuickBooks. When a transaction matches:
- Locate it in the reconciliation window.
- Select its checkbox.
- Continue comparing the remaining transactions.
- Watch the Cleared balance and Difference.
Do not select a transaction simply because the amount looks similar. Compare the relevant details, including the transaction date and amount. If a transaction appears in QuickBooks but is not on the statement, leave it unchecked until you determine why it is present.
Intuit’s reconciliation instructions specifically state that transactions should be checked when they match the statement, and transactions that are not on the statement should not be checked.
Step 4: Continue Until the Difference Is $0.00
As transactions are selected, QuickBooks updates the cleared balance and difference. The target is:
- Difference: $0.00: A zero difference indicates that the selected transactions and entered statement information reconcile to the expected balance. If the difference reaches zero, select:
- Finish now → Done: QuickBooks then saves the reconciliation and creates a reconciliation report. If the difference does not reach zero, do not simply accept the discrepancy without understanding why it exists.
Step 5: Investigate Any QuickBooks Online Reconciliation Difference
If your QuickBooks Online reconciliation difference is not zero, select Edit info and verify the statement information first. Check:
- Ending balance
- Ending date
- Beginning balance
- Transaction dates
- Transaction amounts
- Missing transactions
- Duplicate transactions
- Previously reconciled transactions that may have changed
Intuit’s current guidance recommends verifying the beginning balance, ending balance, and ending date first. If those are correct, review manually entered transactions and look for errors or duplicates. A useful way to approach the discrepancy is to work from the largest and most obvious differences rather than randomly changing transactions.
Step 6: Correct Missing, Duplicate, or Incorrect Transactions
If a transaction is missing from QuickBooks, determine whether it should have been entered manually, downloaded through the bank feed, or matched to an existing transaction. If a transaction appears twice, determine whether both entries represent legitimate transactions. Do not delete one simply because the amounts are identical.
If an existing transaction has an incorrect amount or date, open it and correct the information only when you can verify the correct details from your records or statement. Intuit specifically identifies missing and duplicate transactions as causes of ending-balance problems during reconciliation. After correcting an entry, return to the reconciliation and check the transaction against the statement again.
Step 7: Finish the Reconciliation Only When the Records Agree
Once all statement transactions have been correctly matched and the Difference reaches $0.00, finish the reconciliation. QuickBooks saves the reconciliation report automatically. These reports include beginning and ending balances and identify transactions that were cleared or left uncleared during the reconciliation.
If you cannot identify the reason for a difference, Intuit allows you to finish and accept the difference in some reconciliation workflows, but its current guidance recommends resolving the discrepancy instead. If an adjustment is created to force the reconciliation to balance, consult your accountant before using that approach.
How to Fix QuickBooks Online Reconciliation Difference
If you are asking how to fix reconciliation difference in QuickBooks Online, use a controlled process instead of changing multiple transactions at once.
1. Verify the Statement Ending Balance: Compare the number entered in QuickBooks with the exact ending balance printed on the statement. Also verify the statement ending date. An incorrect statement value can create a difference even when the transaction list is completely accurate.
2. Verify the Beginning Balance: If the account was previously reconciled, compare the current beginning balance with the prior reconciliation’s ending balance. If they do not match, investigate the previous reconciliation before continuing.
3. Look for Missing Transactions: Compare the statement line by line with QuickBooks. A missing deposit, payment, fee, transfer, or other transaction can change the reconciliation difference.
4. Look for Duplicate Transactions: A transaction entered twice can make the QuickBooks balance different from the bank statement. This is especially important when transactions were both manually entered and downloaded through a connected bank feed.
5. Check Previously Reconciled Transactions: If the account reconciled correctly in the past but no longer does, investigate whether someone changed or deleted a transaction that was already reconciled. Intuit identifies changes to previously reconciled transactions as a major cause of beginning-balance discrepancies.
6. Recheck the Difference: After each verified correction, return to the reconciliation and see how the difference changes. This makes it easier to identify which correction actually resolved the discrepancy. Avoid making several unrelated changes simultaneously because doing so can make the original cause difficult to identify.
How to Fix a QuickBooks Online Beginning Balance Discrepancy
A QuickBooks Online beginning balance discrepancy is different from a simple transaction that has not yet been checked. When an account has already been reconciled, the current beginning balance should match the ending balance from the previous reconciliation. If something changed after that reconciliation, the beginning balance can become incorrect.
A. Check the Reconciliation Discrepancy Report

If a previously reconciled account suddenly has the wrong beginning balance, start with the Reconciliation Discrepancy Report.
Intuit states that this report identifies changes to reconciled transactions, shows how those changes affected the balance, and provides information that can help you determine what needs to be corrected. Look for changes such as:
- A reconciled transaction being edited
- A reconciled transaction being deleted
- A transaction being voided
- A reconciled transaction being moved
- A previously reconciled transaction being unreconciled
- A bank-feed transaction being undone
- A transaction dated before the previous reconciliation being manually reconciled
These are among the causes Intuit currently identifies for beginning-balance issues.
B. Check the Audit Log for Deleted or Voided Transactions
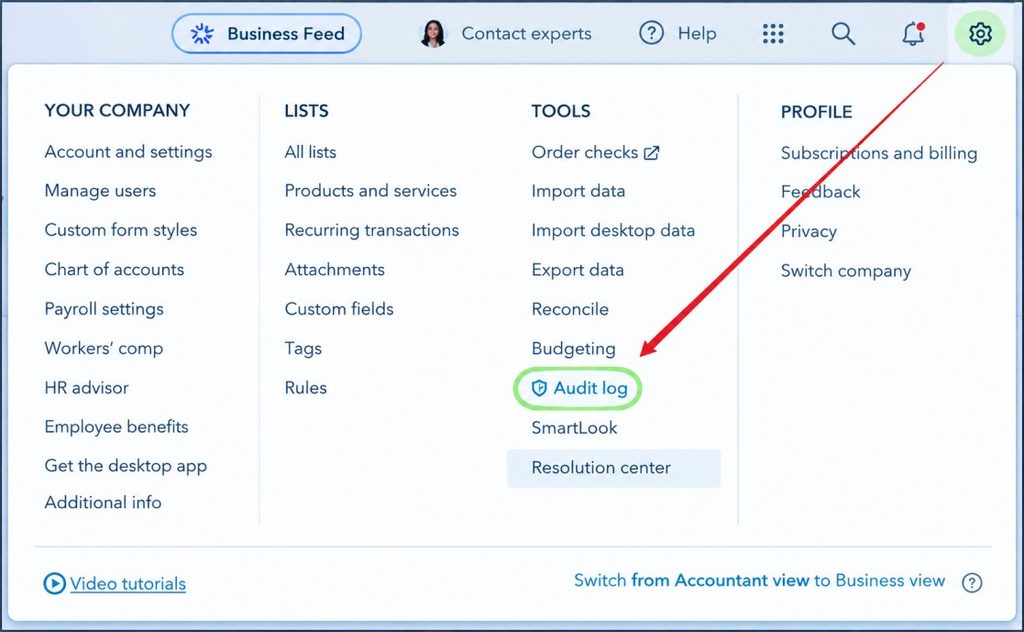
If the discrepancy report does not explain the entire difference, review the Audit log for deleted or voided transactions. Intuit’s current beginning-balance troubleshooting guidance specifically recommends checking the Audit log when the discrepancy remains after reviewing the reconciliation discrepancy report.
Do not change a transaction simply because it appears in a report. First determine whether the change was actually made in error. If the transaction was intentionally changed, reversing that change may create a new accounting problem.
C. If This Is Your First Reconciliation
The troubleshooting path is different when the account has never been reconciled. In that situation, an incorrect beginning balance is often caused by an incorrect opening balance. Intuit recommends comparing the opening balance in QuickBooks with the real-world account balance on the day you started tracking the account.
If you are unsure how the opening balance should be corrected, consult your accountant rather than entering an arbitrary adjustment.
How Do You Unreconcile a Transaction in QuickBooks Online?
Sometimes one transaction was reconciled by mistake or needs to be corrected. In that situation, you can remove that individual transaction from the reconciliation rather than undoing the entire period. Intuit describes this process as changing the transaction from R (reconciled) to C (cleared) and then to blank, which means uncleared.
A. When Should You Unreconcile a Transaction?
Consider unreconciling a transaction when you have confirmed that it:
- Was reconciled accidentally
- Contains an incorrect amount
- Was recorded in the wrong account
- Is a duplicate
- Needs another correction that affects the reconciliation
Do not unreconcile transactions simply because they are difficult to understand. First compare them with the bank statement and your accounting records.
B. Steps to Unreconcile a Transaction
- Go to All apps → Accounting → Chart of accounts.
- Find the account containing the transaction.
- Select View register.
- Locate the transaction.
- Select it to expand the details.
- Select the box showing R in the checkmark column until it becomes blank.
- Select Save.
The transaction is now uncleared and can be corrected before you reconcile the account again. Remember that removing a previously reconciled transaction can affect the beginning balance of your next reconciliation.
How Do You Undo a Full QuickBooks Online Reconciliation?
If an entire reconciliation was completed incorrectly, QuickBooks Online provides an option to undo the reconciliation for eligible users. This is different from unreconciling one transaction. To undo an entire reconciliation:
- Go to All apps → Accounting → Reconcile.
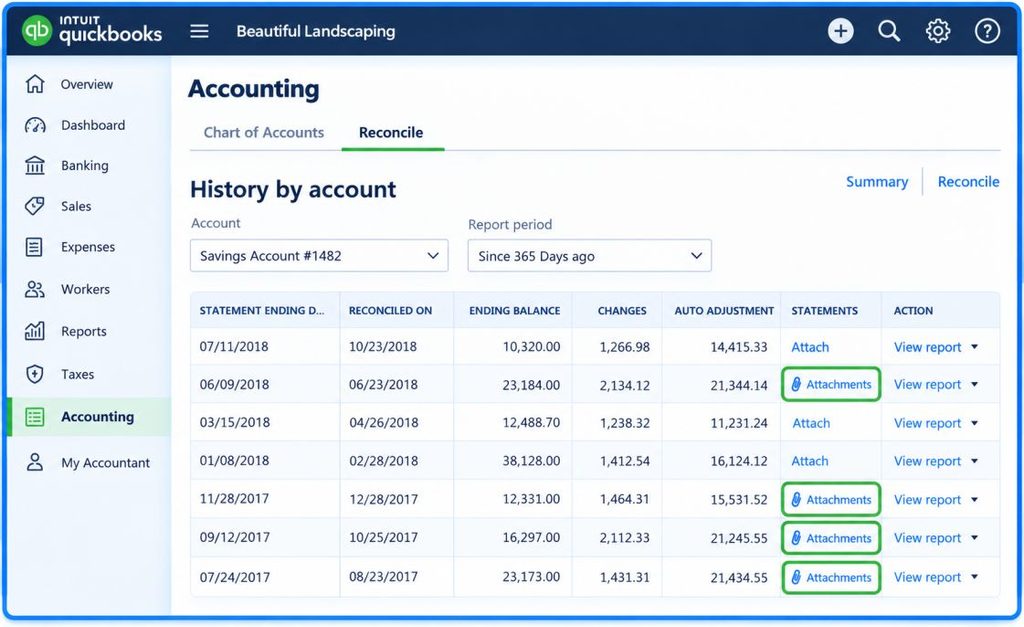
- Select History by account.
- Choose the account and date range.
- Locate the reconciliation you want to undo.
- Open the Action menu.
- Select Undo.
- Review the warning and confirm the action.
- Select Undo reconciliation.
There is an important consequence: undoing a reconciliation also undoes reconciliations completed after the selected reconciliation. The related reconciliation report and attachments are permanently deleted, so save anything you need before proceeding.
How to Prevent QuickBooks Online Reconciliation Problems
Regular reconciliation makes future discrepancies easier to identify because you are less likely to accumulate a large number of unresolved transactions.
- Reconcile regularly: Work through statements consistently rather than allowing multiple periods to remain unreconciled.
- Keep statements available: Retain the bank and credit card statements used during reconciliation so you can compare historical balances later.
- Review bank-feed transactions carefully: Downloaded transactions still need to be reviewed, matched, categorized, or otherwise handled correctly.
- Avoid changing reconciled transactions unnecessarily: Editing or deleting a previously reconciled transaction can affect future beginning balances.
- Investigate differences instead of forcing them to zero: A zero difference should represent an actual match between your records and the statement, not an unexplained adjustment.
- Keep reconciliation reports: QuickBooks automatically generates reconciliation reports after completed reconciliations, and they can be useful when investigating future discrepancies.
- Consult an accountant for historical corrections: If you are unsure whether a correction affects a closed or previously reconciled period, get accounting advice before changing historical transactions.
Conclusion
To reconcile an account in QuickBooks Online, start with the correct bank or credit card statement, verify the beginning and ending balances, enter the statement ending date and balance, and then match each transaction carefully. The reconciliation should finish with a $0.00 difference.
If the account does not balance, check the statement information first, followed by missing or duplicate transactions and changes to previously reconciled entries. A first-time reconciliation with a wrong beginning balance usually requires investigating the account’s opening balance, while an account that was reconciled previously may require the Reconciliation Discrepancy Report and Audit log.
If you need to correct a previous reconciliation, distinguish between unreconciling an individual transaction and undoing an entire reconciliation. The latter can affect later reconciliations and permanently remove associated reconciliation reports and attachments, so it should be used carefully.
FAQs of Reconcile an Account in QuickBooks Online
QuickBooks Online does not allow most users to undo an entire reconciliation with a single click. Undoing a full reconciliation usually requires accountant-level access or professional assistance.
If you believe the entire reconciliation was completed incorrectly, it’s best to work with your accountant or a QuickBooks Live Expert. This approach prevents widespread errors and protects your historical financial data.
If everything in QuickBooks checks out, the issue may originate with the bank or credit card company. Review your statement carefully and contact the financial institution if you suspect an error on their end.
1. Gather all bank or credit card statements, starting with the oldest statement available.
2. Ensure all transactions for the first statement period are entered into QuickBooks.
3. Categorize and review each transaction for accuracy.
4. Go to the Reconcile section in QuickBooks and reconcile the earliest month first.
5. Complete the reconciliation until the difference equals zero.
6. Move on to the next month and repeat the process.
7. Continue reconciling one period at a time until you reach the current month.
Account reconciliation is the process of comparing the transactions recorded in your accounting software with transactions shown on your bank or credit card statement. The goal is to ensure both balances match. Reconciliation helps identify missing entries, duplicate transactions, errors, and potential fraud, ensuring your financial records are accurate and reliable.
1. Start the reconciliation process and review the difference amount.
2. If the difference is not zero, stop the reconciliation.
3. Identify the cause of the discrepancy (missing transaction, wrong amount, or incorrect date).
4. Edit an existing transaction or add a missing one in QuickBooks.
5. Save the corrected transaction.
6. Restart the reconciliation process.
7. Continue matching transactions until the difference equals zero.
Bank Reconciliation
– Matches the cash account in QuickBooks with the bank statement.
– Confirms all deposits and withdrawals are recorded correctly.
Credit Card Reconciliation
– Matches credit card charges and payments in QuickBooks with the credit card statement.
– Ensures expenses and payments are accurately recorded.
Both types help maintain accurate financial records.
1. Open QuickBooks Desktop.
2. Go to the Banking menu and select Reconcile.
3. Choose the account you want to reconcile.
4. Enter the statement ending date and ending balance.
5. Select transactions that match your statement.
6. Review the difference amount as you check off transactions.
7. When the difference equals zero, select Reconcile Now.
8. Save the reconciliation report.
1. Obtain the official bank or credit card statement from your financial institution.
2. Use the statement as the primary reference document.
3. Compare QuickBooks transactions against the statement, not the other way around.
4. Adjust QuickBooks entries to match the statement if discrepancies are found.
5. Complete reconciliation only when balances match exactly.