If your QuickBooks sales tax liability report is incorrect, the problem usually comes from how transactions, sales tax rates, tax agencies, payments, dates, or tax settings have been recorded. A report can show a balance that does not match your sales records even when the underlying transactions appear correct.
The Sales Tax Liability report is designed to help you review taxable sales, nontaxable sales, tax collected, and the amount owed to tax agencies. In QuickBooks Online, you can also drill into tax amounts to review the transactions contributing to the reported figure.
The good news is that you can usually trace the difference back to a specific transaction or configuration. This guide explains what to check in QuickBooks Online and QuickBooks Desktop before filing or paying your sales tax.
Understanding Why Your QuickBooks Sales Tax Liability Report Is Incorrect
Before changing the liability balance, compare the amount you expected with the amount QuickBooks is reporting. The most common causes are listed below.
Common Reasons Your Sales Tax Liability Report Is Incorrect
| Possible Cause | What to Check |
| Wrong date range | Make sure the report covers the correct period. |
| Wrong tax agency | Verify that the correct sales tax agency is selected. |
| Incorrect sales tax rate or code | Check whether transactions were assigned the correct sales tax rate or code. |
| Incorrect taxable status | Confirm that taxable transactions were not recorded as nontaxable, or vice versa. |
| Incorrect customer or product tax treatment | Review the sales tax settings for customers and products. |
| Incorrect sales tax payment | Check whether a sales tax payment was recorded correctly and in the expected period. |
| Refund or credit memo | Review refunds and credit memos that may have changed the tax amount. |
| Incorrect sales tax adjustment | Check whether any sales tax adjustment was entered incorrectly. |
| Different accounting basis | Confirm that the Sales Tax Liability report and the comparison report use the same accounting basis. |
| Transactions outside the review period | Check transaction dates to make sure they fall within the period being reviewed. |
| Company-file data issues | In QuickBooks Desktop, check whether the company file has data integrity issues. |
QuickBooks calculates and displays sales tax based on the tax treatment assigned to transactions. In QuickBooks Online, the calculation can include applicable state, county, and city tax rates.
Start by Checking the Sales Tax Liability Report Settings
A surprising number of apparent discrepancies come from comparing reports that use different reporting periods or tax agencies. Before investigating individual transactions, make sure the Sales Tax Liability report settings match the period you are trying to reconcile.
QuickBooks Online
In QuickBooks Online:
- Go to Reports.
- Search for Sales Tax Liability.
- Open the report.
- Select the correct Report period.
- Select the appropriate Tax Agency, or choose all agencies.
- Select Run report.
- Review the Tax Amount column.
QuickBooks Online also allows you to select a tax amount and open the related transaction details. Depending on the transaction, these details can help you review the customer, transaction date, and tax rate associated with the amount.
QuickBooks Desktop
In QuickBooks Desktop for Windows, go to:
Reports → Vendors & Payables → Sales Tax Liability
Review the reporting dates and tax agencies included in the report. The Sales Tax Liability report summarizes taxable sales, nontaxable sales, tax rates, tax collected, and sales tax payable.
Before moving on to individual transactions, confirm the following:
| Check | What to Confirm |
| Date range | Matches the sales tax filing period |
| Tax agency | Correct agency or agencies are included |
| Taxable sales | Transactions are classified correctly |
| Nontaxable sales | Exempt or nontaxable transactions are classified correctly |
| Tax rate | The correct rate or tax code is being used |
| Tax collected | Agrees with the underlying sales transactions |
| Payments | Sales tax payments are recorded correctly |
If these settings are correct and the liability amount is still different from what you expect, move on to reviewing the underlying transactions.
Reviewing Sales Tax Reports in QuickBooks Desktop
Before comparing sales tax amounts, it helps to understand what each QuickBooks Desktop report shows.
A. Sales Tax Liability Report
The Sales Tax Liability report summarizes:
- Total taxable and nontaxable sales
- Tax rates
- Tax collected
- Sales tax payable as of a specific date
Access: Reports > Vendors & Payables > Sales Tax Liability
The Tax Collected amount will not necessarily match Sales Tax Payable because the payable amount reflects payments that have already been made.
B. Sales Tax Revenue Summary Report
The Sales Tax Revenue Summary report summarizes sales by:
- Tax agency
- Tax code
- Total sales for each tax code
Access: Reports > Vendors & Payables > Sales Tax Revenue Summary
How to Fix Incorrect Sales Tax Liability Amounts
If the Sales Tax Liability amount is still incorrect after checking the report settings and underlying transactions, try the following QuickBooks Desktop troubleshooting steps.
1. Update QuickBooks Desktop
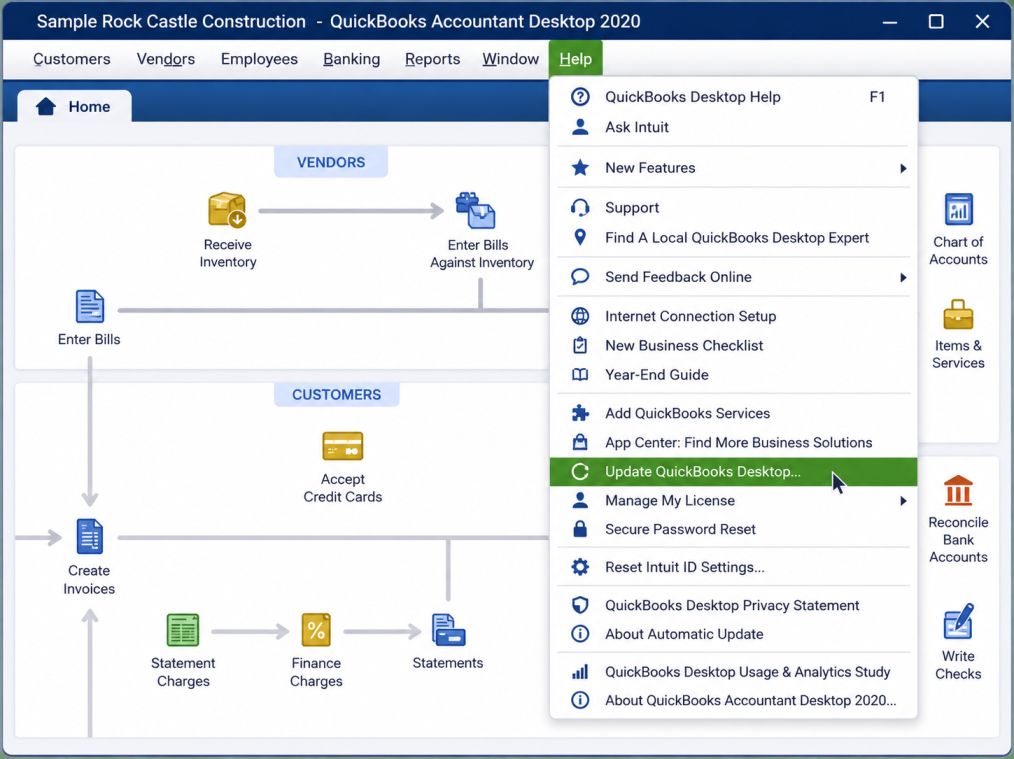
An outdated QuickBooks Desktop installation can cause unexpected behavior or calculation issues. Installing the latest available updates can help rule out problems caused by outdated software.
To update QuickBooks Desktop:
- Open QuickBooks Desktop and go to Help > Update QuickBooks Desktop.
- Select the Update Now tab.
- Check the Reset Update box.
- Select Get Updates.
- When the update finishes, select OK and restart QuickBooks if prompted.
Run the Sales Tax Liability report again to see whether the amount has changed.
2. Check the Report’s Accounting Method
The Sales Tax Liability report can produce different results depending on whether it uses Cash or Accrual accounting. Make sure the report uses the accounting method appropriate for your sales tax reporting requirements and that any comparison report uses the same method.
To check the accounting method:
- Open the Sales Tax Liability report.
- Set the appropriate date range.
- Check the Accounting Method setting.
- Compare the report using Cash and Accrual if you need to determine which setting explains the difference.
- Run the report again and compare the results with your expected amount.
If the accounting method is correct and the discrepancy remains, continue with data verification.
3. Use the Verify and Rebuild Data Tool
If the discrepancy appears to be related to the QuickBooks Desktop company file, the Verify Data and Rebuild Data tools can help identify and repair certain data issues.
Run Verify Data
- Go to Window > Close All.
- Select File > Utilities > Verify Data.
- Review the message QuickBooks displays:
- “No problems detected” — QuickBooks did not find a data integrity problem.
- An error message — Follow the recommended steps for the specific error.
- “Your data has lost integrity” — Run the Rebuild Data tool.
Run Rebuild Data
- Go to File > Utilities > Rebuild Data.
- When QuickBooks asks you to create a backup, select OK.
- Choose a backup location and file name, then save the backup.
- Follow the prompts and wait for the rebuild to finish.
- After the rebuild is complete, run Verify Data again to check whether the data issue has been resolved.
If Verify Data continues to report problems, review the specific error information and consider restoring a known-good backup or getting help from a qualified QuickBooks professional.
Common Sales Tax Liability Problems and the Best Ways to Fix Them
Once the Sales Tax Liability report settings are correct, compare the report with the other QuickBooks reports or windows that show different amounts. A mismatch does not always mean the Sales Tax Liability report is wrong. Differences can result from transaction types, accounting basis, dates, item-to-account settings, payments, or other data issues.
1. Sales Tax Liability Report Total Sales Don’t Match Total Income
It is normal for Total Sales in the Sales Tax Liability report to differ from Total Income in the Profit & Loss report because certain transaction types do not affect both reports in the same way.
To identify the reason for the difference, compare the transaction details in both reports using the same date range and accounting basis.
Step 1: Review the Sales Tax Liability Report
- Go to Reports > Vendors & Payables > Sales Tax Liability.
- Double-click Total Sales to open the detailed report.
- Select Customize Report.
- Choose the appropriate Accrual or Cash basis.
- Set the date range you want to review.
- Under Filters, select Accounts > All ordinary income accounts.
- Under Transaction Type, select Multiple Transaction Types and include all applicable transaction types except Invoice and Sales Receipt.
- Review the transactions contributing to the total.
Step 2: Review the Profit & Loss Report
- Go to Reports > Company & Financial > Profit & Loss Standard.
- Double-click Total Income to open the detailed activity.
- Select Customize Report.
- Use the same Accrual or Cash basis as the Sales Tax Liability report.
- Set the same date range.
- Under Filters, select Accounts > All ordinary income accounts.
- Under Transaction Type, select Multiple Transaction Types and use the same transaction-type selection as the Sales Tax Liability report.
- Compare the transaction details with the Sales Tax Liability report to identify the source of the difference.
If the reports still do not reconcile, review the individual transactions that appear in one report but not the other.
2. Sales Tax Liability Report and Pay Sales Tax Window Don’t Match
If the Sales Tax Liability report does not match the Pay Sales Tax window, first check whether both use the same reporting period and accounting basis.
Step 1: Match the Date Ranges
- Open Reports > Vendors & Payables > Sales Tax Liability.
- Clear the From date if necessary.
- Make sure the To date matches the Show sales tax due through date in the Pay Sales Tax window.
- Run the report again and compare the amounts.
Step 2: Check the Accounting Basis
In QuickBooks Desktop:
- Go to Edit > Preferences > Sales Tax > Company Preferences.
- Review the sales tax basis:
- As of invoice date indicates an Accrual basis.
- Upon receipt of payment indicates a Cash basis.
- Make sure the Sales Tax Liability report uses the same basis.
Step 3: Review Sales Tax Payments Before Changing the Liability
Tax collected and sales tax payable are not necessarily the same amount. In QuickBooks Desktop, the Sales Tax Liability report shows tax collected from applicable sales and the sales tax payable after payments have been taken into account. Therefore, a difference between these amounts does not automatically mean the report is incorrect.
| Description | Amount |
| Tax collected | $5,000 |
| Sales tax payment recorded | $3,000 |
| Remaining payable amount | $2,000 |
In this example, $5,000 in tax collected and $2,000 payable does not by itself indicate an error. When reviewing sales tax payments, confirm:
- The correct tax agency was selected.
- The payment amount is correct.
- The payment date is correct.
- The payment was not entered twice.
- The payment was recorded using the appropriate sales tax payment workflow.
If a regular check was used instead of the appropriate sales tax workflow, review how the payment was recorded before making another adjustment.
Step 4: Review Sales Tax Payable Activity
In the Sales Tax Liability report, review the transactions affecting the Sales Tax Payable amount. Look for sales tax payments, journal entries, adjustments, and checks with incorrect dates or amounts.
Step 5: Check for Incorrect Sales Tax Adjustments
A sales tax adjustment can legitimately change the amount owed, but it should not be used simply to force the Sales Tax Liability report to match another number. Before making or changing an adjustment, determine why the original amount is different. Review:
- The adjustment amount.
- The adjustment date.
- The affected tax agency.
- The reason for the adjustment.
- Whether a previous adjustment already corrected the same issue.
If you cannot explain the difference, investigate the underlying transactions first. An unexplained adjustment can make future sales tax reconciliation more difficult.
Step 6: Check for Future-Dated Transactions
Run the Sales Tax Liability report using All Dates. If the totals now match the Pay Sales Tax window, review transactions dated after the period you are trying to reconcile and correct any entries that were dated incorrectly.
Also confirm that your sales tax preferences are configured correctly and that the Sales Tax Payable account has not been altered incorrectly.
3. Profit & Loss Report Does Not Match a Sales Report
A Profit & Loss report and a Sales report can show different totals because of mismatched dates or accounting bases, incorrect item-to-account mappings, transactions without assigned items, or damaged data.
Step 1: Match the Date Range and Accounting Basis
Open both reports and use the same date range and accounting basis. If you are investigating the complete company file, use All Dates and the Accrual basis for the comparison.
Step 2: Check Item-to-Account Mapping
- Go to Lists > Item List.
- Add the Account and Cost Account columns if they are not already visible.
- Review the items and correct any that are linked to the wrong income account.
Step 3: Look for Transactions Without Items
- Run the Profit & Loss report using Accrual and All Dates.
- Double-click the amount you are investigating to open the detailed transactions.
- Set Total By to Item.
- Review entries listed under No Item.
- Investigate any transactions that should have an item assigned.
Step 4: Compare the Reports Side by Side
Run the Profit & Loss Standard report:
- Go to Reports > Company & Financial > Profit & Loss Standard.
- Select Customize Report.
- Set Dates to All and the basis to Accrual.
- Double-click the account you want to investigate to open the transaction details.
- Set Total By to Item.
Then run the Sales by Item Summary report:
- Go to Reports > Sales > Sales by Item Summary.
- Select Customize Report.
- Set Dates to All and the basis to Accrual.
- If you are viewing a summary, double-click the total to open the detailed transactions.
- Set Total By to Item.
Close the source reports so that only the two detailed reports remain visible. Go to Window > Tile Vertically and compare the reports line by line to identify where the amounts differ.
Step 5: Check for Data Issues
If the reports still do not reconcile after checking the dates, accounting basis, item mappings, and transactions, use the QuickBooks Desktop data verification and repair process described later in this guide.
How to Reconcile an Incorrect QuickBooks Sales Tax Liability Report
If you want a practical order to follow, work through these checks:
- Confirm the reporting period.
- Confirm the tax agency.
- Check the accounting basis.
- Review taxable and nontaxable transactions.
- Verify sales tax rates and codes.
- Check transaction dates around the filing-period cutoff.
- Review refunds and credit memos.
- Review sales tax payments.
- Check sales tax adjustments.
- Compare the liability report with supporting sales tax reports.
- Drill into individual transactions where possible.
- Run Verify Data if QuickBooks Desktop shows signs of data problems.
- Use Rebuild Data only when Verify Data identifies an integrity problem.
- Run the report again after correcting the underlying issue.
This approach is more reliable than entering a manual adjustment simply because two report totals do not match.
Final Thoughts
When your QuickBooks Sales Tax Liability Report is incorrect, it can disrupt tax filings and financial reporting. Fortunately, most issues can be resolved by updating QuickBooks, correcting accounting methods, verifying data integrity, and aligning report settings. By following the solutions above, you can restore accuracy and maintain compliance—protecting your business from costly tax mistakes.
If problems persist, consider consulting a QuickBooks ProAdvisor or restoring a recent backup to preserve data accuracy.
Frequently Asked Questions
To view the report, go to Reports → search for Sales Tax Liability Report.
This report shows:
1. Total taxable and non-taxable sales
2. Sales tax collected
3. Amount owed to each tax agency
Reading it helps you verify that your collected tax matches what you must remit.
QuickBooks automatically categorizes sales tax using Sales Tax Payable accounts.
To ensure taxes are categorized correctly:
1. Enable Automated Sales Tax (AST)
2. Assign the correct tax codes to products and services
3. Select the correct tax agency for each transaction
This ensures accurate reporting and payments.
Mismatches often occur due to:
1. Backdated transactions
2. Incorrect or missing tax codes on invoices
3. Manual journal entries affecting tax accounts
4. Voided or edited transactions after filing
Review recent transactions and run the Sales Tax Liability and Taxable Sales Summary reports to identify discrepancies.
Incorrect calculations may result from:
1. Wrong tax agency settings
2. Products/services assigned to incorrect tax categories
3. Outdated location-based tax rates
4. Using custom rates when automated tax is enabled
Check your Sales Tax Settings and verify item tax codes to correct the issue.
1. Going to Reports
2. Searching for Sales Tax Liability Report
3. Adjusting the Report Period and Accounting Method
4. Clicking Customize → expand Rows/Columns or Filters for more detail
This allows invoice-level or item-level tax breakdowns.
1. Use Automated Sales Tax whenever possible
2. Assign correct tax codes to all items and customers
3. Reconcile your sales tax liability regularly
4. Avoid manually editing tax amounts
5. Keep tax rates updated for your jurisdiction
Following these practices ensures cleaner records and accurate filings.