Printing 1099 forms from QuickBooks should be a straightforward part of year-end tax preparation, but a printing problem can quickly become frustrating. You may find that QuickBooks 1099 Forms Not Printing, the form comes out blank, the PDF will not print, or the information appears shifted outside the correct boxes.
The cause is not always QuickBooks itself. Depending on whether you use QuickBooks Online or QuickBooks Desktop, the problem can involve the browser, PDF viewer, printer, printer driver, paper setup, scaling, or the QuickBooks version.
The best way to troubleshoot the problem is to identify where the printing process fails. If the 1099 looks correct in preview but prints incorrectly, focus on the printer and print settings. If the preview or PDF is already wrong, investigate the QuickBooks or browser workflow first.
This guide explains how to diagnose and resolve QuickBooks 1099 printing problems, including blank forms, alignment errors, PDF issues, and problems printing 1099-NEC and 1099-MISC forms.
Why Correct 1099 Printing Matters Before You File or Mail Forms
A 1099 is a tax information form, so accurate output matters. A printing problem can affect the readability or placement of information even when the underlying data in QuickBooks is correct. For example, you might see:
- Names or amounts shifted away from their intended boxes
- Information cut off at the edge of the page
- A completely blank printed page
- A PDF that displays correctly but prints incorrectly
- Different alignment between the preview and the physical form
- A 1099-NEC or 1099-MISC that does not match the required form layout
It is useful to separate data accuracy from printing accuracy. QuickBooks may contain the correct contractor information while your printer produces an incorrectly scaled or aligned page. The IRS maintains separate instructions for Forms 1099-NEC and 1099-MISC, including rules concerning the different copies of the forms and how they are furnished or filed. Always use the current IRS instructions for the applicable tax year rather than relying on an older printing article.
What Are the Most Common QuickBooks 1099 Printing Problems?
A QuickBooks 1099 printing problem can appear in several different ways. Identifying the exact symptom will help you avoid changing settings that are unrelated to the problem.
| Problem | What you may notice | Where to look first |
| 1099 will not print | Nothing comes from the printer | Printer, driver, browser, or QuickBooks |
| Blank form | Page prints with little or no information | Preview, PDF, printer |
| Misaligned form | Text does not sit inside the boxes | Scaling, paper, alignment |
| Cut-off information | Part of the form disappears | Page size or printer margins |
| PDF will not print | PDF opens but does not produce a page | PDF viewer or printer |
| Preview looks wrong | Data is already misplaced before printing | QuickBooks or browser |
| Desktop printing fails | QuickBooks cannot send the form to the printer | Desktop update and printer setup |
| Online printing fails | Browser/PDF workflow does not produce correct output | Browser and PDF settings |
This distinction is important. If the QuickBooks 1099 print preview is correct and the PDF is also correct, repeatedly changing QuickBooks data will not solve a physical printing problem.
What Should You Check Before Troubleshooting QuickBooks 1099 Printing?
Before making changes, run a few simple checks. They can save you from wasting forms or spending time on the wrong setting.
A. Confirm Your QuickBooks Version
If you use QuickBooks Desktop, update the software before attempting to print your 1099s. Intuit’s current instructions specifically state that QuickBooks Desktop must be on the latest release for 1099 forms to print correctly.
For Desktop, the current Intuit workflow begins with updating QuickBooks and then going to Vendors → 1099 Forms → Print/E-file 1099 Forms. Check the Printer, Make sure:
- The correct printer is selected.
- The printer is powered on and connected.
- There are no printer error messages.
- The paper is loaded correctly.
- The printer can print another ordinary document.
If another document also fails to print, the issue is probably not specific to your 1099.
B. Review the 1099 Preview
Before printing, look carefully at the preview. Check whether:
- Contractor information is present.
- Amounts appear in the expected boxes.
- The correct 1099 type is being used.
- The page is complete rather than partially rendered.
If the preview is already incorrect, concentrate on the QuickBooks 1099 workflow rather than printer alignment.
C. Check the Form and Paper
Use the form and paper type appropriate for the printing workflow you are following. Do not assume that any generic 1099 paper will produce the same result. Intuit’s current instructions for QuickBooks Online also direct users through an alignment check before printing forms.
How to Fix QuickBooks 1099 Forms Not Printing
Start by identifying your QuickBooks product and where the printing process stops. Then work through the least disruptive checks before moving to printer or PDF troubleshooting.
Step 1 — Identify Whether You Use QuickBooks Online or Desktop
First determine which QuickBooks product you are using. The current 1099 workflow differs between:
- QuickBooks Online
- QuickBooks Online Contractor Payments
- QuickBooks Desktop
- QuickBooks Desktop for Mac
For example, QuickBooks Desktop uses Vendors → 1099 Forms → Print/E-file 1099 Forms, while QuickBooks Online uses the 1099 filing area to create, complete, view, or print forms.
Do not follow a Desktop printer procedure inside QuickBooks Online or assume that a QuickBooks Online browser problem requires Desktop repair tools. Once you identify the product, use the corresponding workflow below.
Step 2 — Make Sure the 1099 Forms Have Actually Been Created
If the 1099 print option is missing or there is nothing available to print, first determine whether the forms have been created.
1099s are not automatically available as printable forms simply because contractor payments exist in your books. Intuit’s current documentation distinguishes between preparing the forms, choosing whether to e-file or print and mail, and printing completed forms after e-filing.
If you are preparing a form for the first time, complete the 1099 preparation process before troubleshooting the printer. For QuickBooks Desktop, Intuit’s current workflow is:
- Go to Vendors.
- Select 1099 Forms.
- Select Print/E-file 1099 Forms.
- Create the 1099s.
- Select the appropriate filing method.
- Choose the 1099-NEC or 1099-MISC form.
- Select the date range.
- Select the vendors.
- Select Print 1099.
- Confirm the printer settings and print.
If the form never reaches the printing stage, the problem may be with preparation rather than the physical printer.
Step 3 — Update QuickBooks Desktop Before Printing
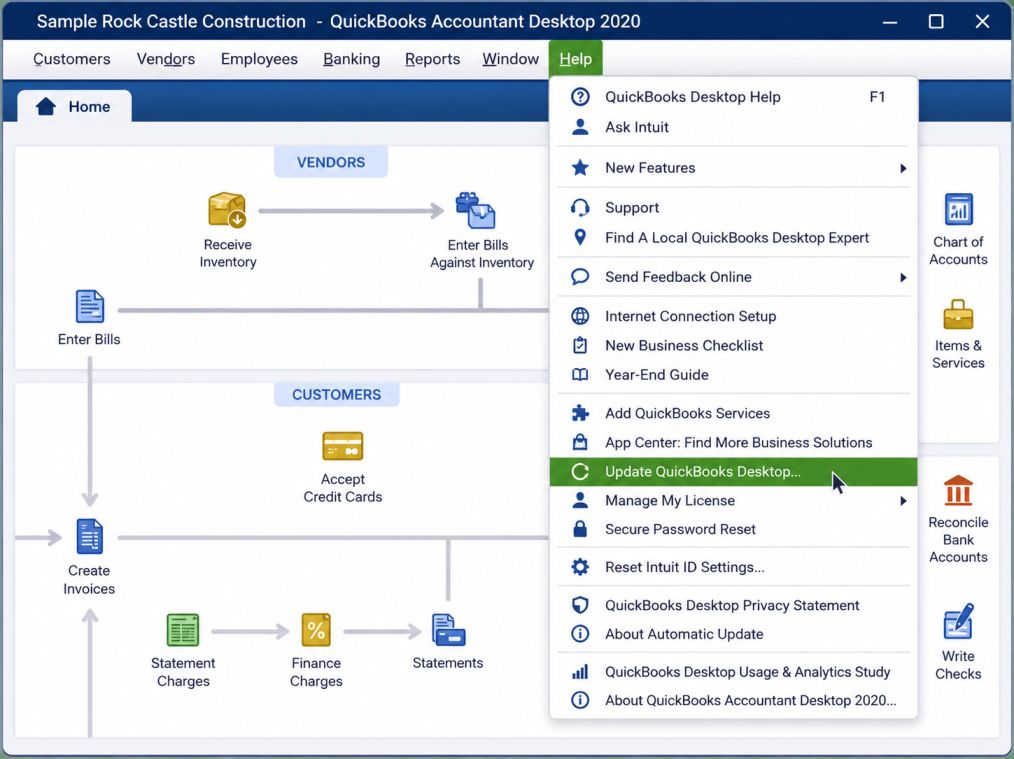
If you use QuickBooks Desktop and 1099 forms are not printing, check the product release before changing printer settings.
Intuit’s current 1099 instructions explicitly state that QuickBooks Desktop must be updated to the latest release for 1099s to print correctly. The current guidance also instructs users to select the Reset Update checkbox when updating for this purpose. After updating:
- Open QuickBooks Desktop.
- Confirm that the update has completed.
- Reopen the company file if necessary.
- Return to the 1099 workflow.
- Try generating and printing the forms again.
If the 1099 now prints correctly, there was no need to modify Windows printer settings. This step is particularly important when the problem begins after a product update, during the annual 1099 preparation period, or when using an older QuickBooks Desktop release.
Step 4 — Check the 1099 Date Range and Vendor Selection
If QuickBooks opens the 1099 workflow but some expected forms do not appear, check the date range and vendor selection before assuming that printing has failed.
In QuickBooks Desktop, Intuit’s current process requires you to specify the date range and select the vendors whose forms you want to print. Review:
- The tax year or applicable date range
- The selected 1099 form type
- The vendors selected for printing
- Whether the expected vendor appears in the 1099 preparation results
- Whether the vendor’s payments are included in the 1099 review
If a particular vendor does not appear, that is different from a printer that refuses to print. Do not repeatedly send a form to the printer when the vendor or form was never included in the generated 1099 set.
Step 5 — Check Whether You Need to Print a Completed 1099
If you already e-filed the 1099, the process for obtaining another copy is different from creating a new form. For QuickBooks Online, Intuit currently directs users to:
All apps → Expenses & Bills → 1099s → Completed forms → View 1099
This opens a PDF copy of the completed form that can be viewed or printed. This distinction is important because you should not necessarily restart the 1099 creation process simply because you need another paper copy.
If the form was already completed and accepted through an electronic filing workflow, first look for the completed form or PDF copy.
Step 6 — If QuickBooks Online Is Not Printing, Check the Browser

For QuickBooks Online 1099 forms not printing, the browser can be part of the problem. Intuit currently recommends using Google Chrome or Mozilla Firefox for 1099 printing. If the 1099 does not print correctly, Intuit provides browser-specific PDF troubleshooting steps.
If you use Chrome, Intuit recommends checking the PDF-document setting so PDF files download instead of automatically opening inside Chrome:
- Open Chrome.
- Select the three-dot menu.
- Open Settings.
- Go to Privacy and security.
- Select Site settings.
- Open Additional content settings.
- Select PDF documents.
- Enable the option to download PDF files instead of automatically opening them.
- Return to QuickBooks and try printing the 1099 again.
If the PDF downloads successfully, open it using an appropriate PDF application and print it from there. This helps separate a QuickBooks Online form-generation issue from a browser’s PDF-handling behavior.
Step 7 — Check PDF Printing and Printer Scaling
If the 1099 PDF opens successfully but the printed form is blank, incomplete, or incorrectly positioned, check the PDF and printer settings. Intuit specifically recommends checking the print window’s scaling options when 1099 forms are not aligned correctly. For example, in Chrome, Fit to printable area or Fit to paper should not be selected when it causes the form to scale incorrectly. Before printing the final forms, check:
- Correct printer selected
- Correct paper/form size
- Scaling settings
- PDF print preview
- Orientation
- Printer availability
- Whether the PDF itself displays correctly
If the information looks correct in the PDF but is misplaced on the physical form, investigate scaling and alignment rather than changing the QuickBooks vendor data.
Step 8 — Test the Printer Outside QuickBooks
If you use QuickBooks Desktop and the 1099 does not print, determine whether the printer works outside QuickBooks. Intuit’s general QuickBooks Desktop printing troubleshooting recommends printing from another program, such as Notepad, to establish whether the problem is specific to QuickBooks or affects the Windows printing environment more broadly. Intuit also recommends ensuring that the computer is connected to the printer and that the printer driver is current. Try printing a simple document from another Windows application.
- If another application also cannot print: The issue is likely outside the 1099 workflow. Check the printer connection, driver, printer status, and Windows printing configuration.
- If another application prints normally: The problem may be specific to QuickBooks, its PDF/printing components, or the 1099 form workflow.
This test prevents you from treating a system-wide printer problem as a QuickBooks 1099 problem.
Step 9 — Repair QuickBooks Desktop Printing Components
If ordinary documents print correctly but QuickBooks Desktop still cannot print the 1099, investigate QuickBooks’ PDF and printing components. Intuit’s current Print and PDF Repair Tool documentation lists problems it can address, including:
- Problems connecting to the selected printer
- QuickBooks not responding during printing
- Missing PDF components
- QuickBooks PDF Converter problems
- Printing failures involving the QuickBooks PDF system
This is an advanced Desktop troubleshooting step, so it should not be the first action when a 1099 is merely misaligned. Before using repair tools, confirm:
- QuickBooks Desktop is updated.
- The printer works outside QuickBooks.
- The 1099 has been successfully created.
- The correct printer is selected.
- The problem is specifically occurring inside QuickBooks.
Then use Intuit’s current printing/PDF repair process appropriate to your QuickBooks Desktop installation.
Step 10 — Check the Physical 1099 Form and Alignment
If the 1099 technically prints but the information does not line up correctly, the issue is different from a failure to print. Intuit’s current 1099 instructions include an alignment check for QuickBooks Online printing, while QuickBooks Desktop provides a print-preview and printer-settings workflow for the forms. Check:
- Correct 1099 form type
- Correct paper/form stock
- Printer scaling
- Print orientation
- Preview alignment
- Printer margins
- Whether the PDF itself is aligned
Do not repeatedly print on official forms while testing. Use the appropriate preview or alignment procedure first so you do not waste forms.
QuickBooks 1099 Forms Not Showing for a Vendor
If a 1099 is missing for only one or a few vendors, do not immediately troubleshoot the printer. The problem may occur during 1099 preparation rather than during printing. In QuickBooks Desktop, review the vendors and payment information included in the 1099 preparation process before trying to print. Check:
- Whether the vendor is included in the 1099 preparation.
- Whether the relevant payments fall within the selected date range.
- Whether the payments are included in the 1099 review.
- Whether the correct 1099 form type is being prepared.
- Whether the vendor information is complete.
If other vendors’ 1099s print successfully but one vendor is missing, the problem is more likely related to the 1099 preparation or vendor/payment information than to the printer itself. Resolve the missing vendor or payment information first, then return to the printing workflow.
How Can You Fix QuickBooks 1099 Printer Settings and Alignment?
When a 1099 prints but the information is not positioned correctly, the problem is usually related to printing or alignment settings rather than the underlying 1099 data.
For example, the contractor’s name may appear slightly above the designated area, or an amount may be shifted to the left or right. In this situation, the issue is with the printed output rather than necessarily with the information stored in QuickBooks.
1. Test Alignment Before Printing Official Forms
Do not immediately print a large batch of official 1099 forms while testing alignment.
- Generate a sample printout.
- Compare the printed page with the corresponding form.
- Identify whether the information is too high, too low, too far left, or too far right.
- Make a small adjustment to the relevant print or alignment setting.
- Print another sample and compare it again.
- Repeat the process until the information is positioned correctly.
QuickBooks Desktop and QuickBooks Online use different 1099 printing workflows, so the available alignment and printing options depend on which product you use.
2. Change One Printing Setting at a Time
Avoid changing the printer driver, scaling, paper size, alignment, and browser settings at the same time. If you change several settings together, it becomes difficult to determine which change fixed the problem. Instead, make one change at a time and test the result. This makes it easier to identify the setting responsible for a QuickBooks 1099 alignment problem and reduces unnecessary changes to your printing setup.
How Do You Print 1099-NEC and 1099-MISC Forms Correctly?
QuickBooks supports workflows for both 1099-NEC and 1099-MISC, but you should select the form that matches the type of payment being reported. In QuickBooks Desktop, Intuit’s current instructions provide separate options for printing 1099-NEC and 1099-MISC after you enter the 1099 workflow.
In QuickBooks Online, you can review the prepared forms before completing the filing or printing workflow. Intuit’s current Online documentation describes reviewing the 1099-NEC and 1099-MISC forms during preparation. If you are unsure which form or box applies to a particular payment, do not use printer troubleshooting as a substitute for tax guidance. Review the current IRS instructions or consult a qualified tax professional.
QuickBooks Online 1099 Forms Not Printing
QuickBooks Online uses a browser-based 1099 printing workflow, so browser and PDF settings can affect the final output.
If you are preparing a new 1099, complete the 1099 preparation process and select the appropriate print option. If the 1099 was already e-filed and you need another copy, use the completed-form workflow instead of creating the form again. If the 1099 will not print:
- Use Google Chrome or Mozilla Firefox.
- Check the browser’s PDF settings.
- Download the 1099 PDF instead of relying on in-browser PDF rendering.
- Open the downloaded PDF in a PDF viewer.
- Check the printer and scaling settings before printing.
If the PDF itself cannot be generated or viewed correctly, focus on the QuickBooks Online and browser workflow first. If the PDF looks correct but the physical form prints incorrectly, move on to printer, scaling, and alignment troubleshooting.
QuickBooks 1099 Form Misaligned When Printing
A misaligned 1099 is different from a form that will not print at all. If the form prints but names, addresses, amounts, or other information do not line up with the correct boxes, check the print settings before changing the underlying QuickBooks data.
Intuit’s current QuickBooks Online guidance specifically recommends checking the print Scale setting and avoiding options such as Fit to printable area or Fit to paper when they cause the form to resize incorrectly. Use this sequence:
- Open the generated 1099 and confirm that the PDF itself is aligned correctly.
- Open the print dialog.
- Select the correct printer.
- Check the paper or form size.
- Review the scale setting.
- Disable automatic scaling if it changes the form dimensions.
- Print a test copy before using the remaining forms.
If the PDF is correctly positioned but the physical form is shifted, focus on the printer configuration, scaling, paper size, and alignment rather than changing the QuickBooks 1099 data.
How to Prevent QuickBooks 1099 Printing Problems
A few preparation habits can reduce avoidable 1099 printing problems when forms need to be produced.
- Keep QuickBooks Desktop updated: Intuit specifically requires the latest release for QuickBooks Desktop 1099s to print correctly.
- Review forms before printing: Confirm the vendors, date range, and 1099 type before sending forms to the printer.
- Check PDF output first: When using QuickBooks Online, make sure the generated PDF opens correctly before printing multiple forms.
- Keep browser settings compatible: If you use QuickBooks Online, use a supported/recommended browser and check PDF-handling settings when printing problems occur.
- Test printer output: Make sure the printer works from another application before beginning a large 1099 print job.
- Check scaling before using forms: Incorrect scaling can cause otherwise valid 1099s to print out of alignment.
- Keep completed forms accessible: If a form has already been e-filed, use the completed-form/PDF workflow rather than unnecessarily recreating the 1099.
Conclusion
When QuickBooks 1099 forms are not printing, first determine where the process fails. If the form is not being created, investigate the 1099 preparation and vendor information. If the form is created but the PDF will not print, check the browser or PDF workflow. If QuickBooks Desktop cannot print while other applications work normally, investigate its printing and PDF components.
For QuickBooks Desktop, updating to the latest release is particularly important because Intuit states that current 1099 forms require the latest release to print correctly. For QuickBooks Online, browser and PDF settings can affect the printing process.
Keeping the product updated, verifying the 1099 data before printing, checking PDF output, and testing the printer before using official forms can help separate form-generation problems from ordinary printing issues.
FAQs of QuickBooks 1099 Forms Not Printing
To fix check printing errors in QuickBooks, try these steps:
1. Check Printer Setup: Go to File → Printer Setup in QuickBooks and ensure the correct printer is selected for check printing.
2. Use Alignment Tools: Within the Printer Setup window, select Align to fine-tune how check fields print on the check paper.
3. Disable Scaling: In your printer preferences, turn off “Fit to Page” or scaling — set scaling to 100% so QuickBooks prints at the correct size.
4. Update Drivers & Software: Install the latest printer drivers and update QuickBooks to the latest release.
5. Repair Print Components: If issues persist, run the QuickBooks PDF & Print Repair Tool from the QuickBooks Tool Hub to resolve underlying printing problems.
To align 1099 forms in QuickBooks Desktop:
1. Go to File → Printer Setup.
2. In the Form Name dropdown, choose 1099s/1096.
3. Click the Align button.
4. Print a sample and adjust horizontal/vertical alignment as needed.
5. Click OK to save.
If alignment still isn’t right, you can also test with blank paper first, adjust settings, and then load your official IRS 1099 paper for final printing.
QuickBooks Online doesn’t have the same built-in alignment tool as Desktop. Instead:
1. Save 1099-NEC as PDF: Generate the form in QuickBooks Online and save it as a PDF first.
2. Adjust Print Settings: Before printing, open the PDF and set your printer scaling to 100% and orientation to Portrait.
3. Preview: Use the PDF viewer’s print preview to make sure the form alignment looks right before sending to the printer.
Because the browser and PDF viewer affect output, these print settings are crucial for Online.
To print a list of 1099 vendors:
1. Go to Reports in QuickBooks Desktop.
2. Choose Vendors & Payables.
3. Select a report like 1099 Summary or 1099 Detail.
4. Customize the report to show only vendors eligible for 1099s (date range, boxes, etc.).
5. Click Print to generate the list.
This lets you review vendor information before printing forms.
Yes, you can print to blank paper first for alignment testing:
1. Select Form: In QuickBooks, choose the 1099 form you want to print.
2. Print to Blank Paper: Insert blank paper and choose the Print on blank page or simply print normally.
3. Test Alignment: Hold the blank printout up to your official pre-printed form to check alignment. Adjust settings as needed. WizXpert
Once satisfied with alignment on blank paper, load your official 1099 forms.
Since QuickBooks Online doesn’t have a built-in alignment tool:
1. Export to PDF: Generate the 1099-MISC or 1099-NEC forms as PDFs.
2. Set Print Options: In your PDF viewer, set scaling to 100%, orientation to Portrait, and disable “Fit to page.”
3. Print Preview: Use print preview to confirm the text fits the boxes before printing on official paper.
Sometimes you may need to adjust printer settings or try another PDF viewer for best results.
QuickBooks printing can be interrupted or canceled by another program when:
1. Another application has control of the printer driver or queue
2. A PDF print service (like Microsoft Print to PDF) is interfering
3. QuickBooks print components are corrupted
To Fix It:
1. Ensure no other programs (e.g., Word, Acrobat) have an open connection to the printer.
2. Close all printing-related apps before printing from QuickBooks.
3. Run the QuickBooks PDF & Print Repair Tool via QuickBooks Tool Hub, which fixes issues with QuickBooks’s print engine.
4. If needed, reset QuickBooks’s print settings by renaming the QBPrint.qbp file so QuickBooks creates a fresh one.
The cause depends on where the process stops. Check whether the 1099 was created correctly, whether QuickBooks Desktop is updated, whether the browser can generate the PDF, and whether the printer works outside QuickBooks. Browser/PDF settings can affect QuickBooks Online, while QuickBooks Desktop may require the latest release and functioning PDF/printing components.
Yes. In QuickBooks Online, completed forms can be accessed from the 1099 filing area. Intuit’s current instructions direct users to All apps → Expenses & Bills → 1099s → Completed forms → View 1099 to view a PDF copy of a completed form.
First confirm that QuickBooks Desktop is updated and that the 1099 was successfully generated. If other applications print normally but QuickBooks does not, the problem may involve QuickBooks’ PDF or printing components. Intuit provides a Print and PDF Repair Tool for several Desktop printing and PDF problems, including printer-connection and PDF-component issues.