Printing issues in QuickBooks Desktop can interrupt everyday tasks such as printing invoices, checks, reports, paychecks, and other business forms. You may find that QuickBooks cannot communicate with your printer, stops responding when you select Print, fails to save a document as a PDF, or produces a form with incorrect formatting.
The cause is not always QuickBooks itself. A QuickBooks Print Issue can come from Windows printer settings, an outdated printer driver, the Print Spooler service, QuickBooks printer configuration, a damaged QBPrint.qbp file, PDF components, or a problem with a particular company file or form template.
The best approach is to identify where the failure occurs before making major changes. The steps below cover the most useful ways to troubleshoot PDF and printing problems with QuickBooks Desktop on Windows.
What QuickBooks Desktop Printing Problems Usually Look Like
Printing problems can appear in several different ways. Identifying the exact symptom helps you choose the right troubleshooting step instead of changing settings unnecessarily.
Common symptoms include:
- QuickBooks cannot print a transaction or report.
- QuickBooks stops responding when you try to print.
- QuickBooks cannot save a form or report as a PDF.
- The QuickBooks PDF Converter is unavailable or shows an error.
- QuickBooks reports a missing PDF component.
- Microsoft XPS Document Writer does not work.
- A printed invoice or check is misaligned.
- Only a particular form or customized template fails to print.
- Payroll checks print incorrectly or in the wrong order.
- Printing works in Windows but fails inside QuickBooks.
- Printing works in one company file but not another.
- Errors such as PDF Converter activation errors, including -20, -30, or -41, appear.
These symptoms can have different causes, so start with simple tests before moving into advanced repairs.
First, Determine Whether the Problem Is QuickBooks or Your Printer
Before troubleshooting QuickBooks, take a moment to check your printer first. These quick checks can help you find and fix common printing problems.
- Power: Make sure your printer is turned on and ready to print.
If you see an error message or warning light, address it before continuing. - Connection: Check that the printer is connected to your computer or network.
Also make sure Windows recognizes the printer. - Printer status: Check that Windows does not show the printer as offline.
The printer should be available and ready to receive print jobs. - Paper: Make sure paper is loaded correctly in the printer.
Check that there are no paper-related issues preventing printing. - Print queue: Open the print queue and check for failed or stuck jobs.
A failed job in the queue can prevent new documents from printing. - Printer driver: Make sure the appropriate printer driver is installed.
An incorrect or missing driver can prevent Windows from communicating properly with the printer. - Windows test page: Print a Windows test page to confirm that the printer works outside QuickBooks.
If the test page fails, resolve the Windows or printer problem before troubleshooting QuickBooks.
How to Resolve PDF and Printing Issues in QuickBooks Desktop
If QuickBooks Desktop won’t print, email, or save a document as a PDF, the problem may be related to QuickBooks print components, Windows permissions, printer settings, or the Microsoft XPS Document Writer. Start with the QuickBooks Print & PDF Repair Tool, then move through the solutions below based on the problem you’re experiencing.
Solution 1: QuickBooks Print & PDF Repair Tool
The QuickBooks Print & PDF Repair Tool is a good first step for common PDF and printing problems. It can repair QuickBooks components that may be preventing you from printing, emailing forms, or saving documents as PDFs.
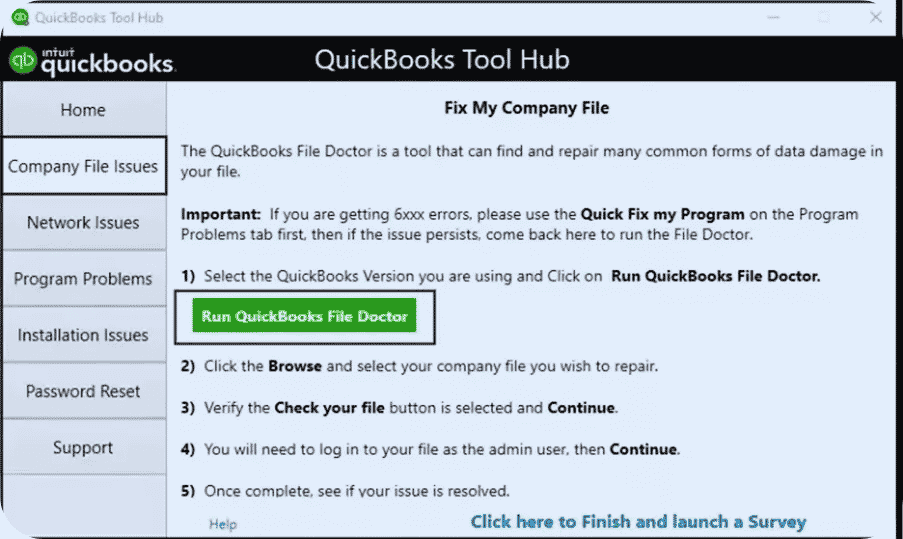
Step 1: Download and Install QuickBooks Tool Hub
Before running the repair tool, close QuickBooks Desktop.
- Download the latest version of QuickBooks Tool Hub and save the file somewhere you can easily find it.
- Open QuickBooksToolHub.exe.
- Follow the on-screen instructions and accept the terms and conditions.
- After installation, open QuickBooks Tool Hub from your desktop or Windows Search.
Step 2: Run the Print & PDF Repair Tool
- Open QuickBooks Tool Hub.
- Select Program Problems.
- Select QuickBooks PDF & Print Repair Tool.
- Wait for the tool to finish. The repair usually takes about a minute.
- Open QuickBooks Desktop and try to print, email, or save the document as a PDF again.
If the problem continues, move to the next solution.
Solution 2: Restart QuickBooks and Reset TEMP Folder Permissions
If the repair tool does not resolve the problem, Windows temporary-folder permissions may be preventing QuickBooks from creating PDF files.
Step 1: Restart Your Computer
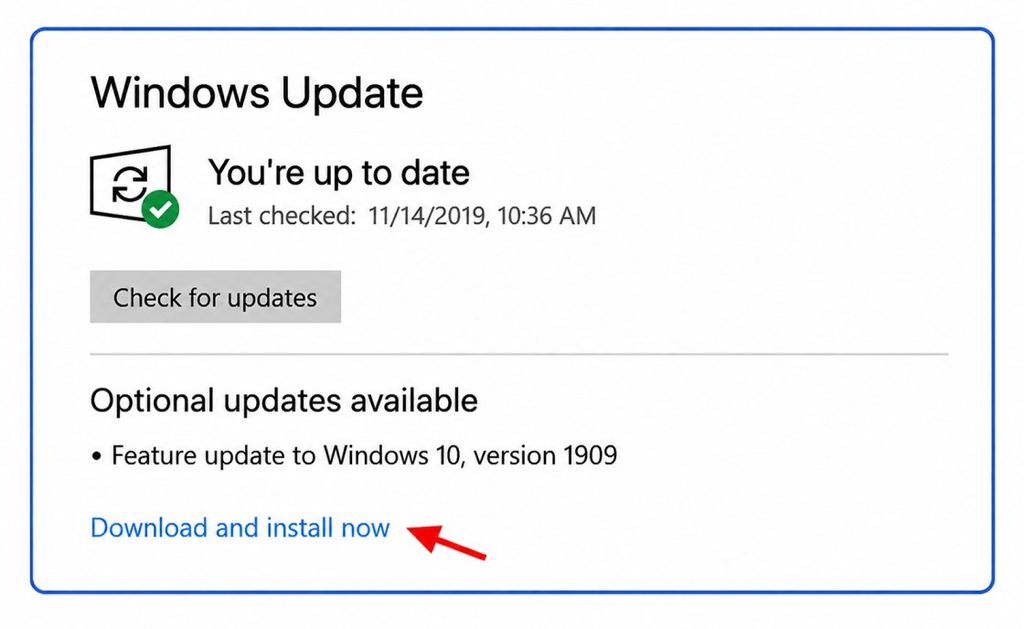
Restart your computer and then try printing or saving the document as a PDF again.
If the problem remains, reset the permissions for your TEMP folder.
Step 2: Reset TEMP Folder Permissions
- Press Windows + R to open the Run command.
- Type %TEMP% and press Enter.
- Right-click an empty area inside the Temp folder and select Properties.
- Open the Security tab.
- Make sure the listed users and groups have Full Control.
- Apply the changes and try saving a PDF from QuickBooks again.
Step 3: Test Microsoft XPS Document Writer
QuickBooks uses parts of the Microsoft XPS Document Writer when creating PDF files. Testing it outside QuickBooks can help determine whether the problem is with QuickBooks or Windows.
- Open Notepad.
- Type Test.
- Select File > Print.
- Choose Microsoft XPS Document Writer and select Print.
- Enter a file name and save the file to your desktop.
- Open the saved XPS file to confirm that it was created successfully.
If you cannot print to the XPS Document Writer outside QuickBooks, the problem may be related to Windows and may require help from your IT professional or Microsoft.
Step 4: Enable Microsoft XPS Document Writer
If Microsoft XPS Document Writer is missing or disabled, enable it through Windows Features.
- Open Control Panel.
- Select Programs > Programs and Features.
- Select Turn Windows features on or off.
- Find and check Microsoft XPS Document Writer.
- Select OK and restart your computer.
Windows 11 users should make sure the XPS Document Writer is enabled when troubleshooting PDF problems.
Solution 3: Create a New QuickBooks Template or Form
If the PDF problem affects only a specific invoice, form, or report, the template may be causing the issue.
- Create a new template for the affected form.
- Apply the new template to the transaction.
- Try saving or emailing the form as a PDF again.
If the new template works, the original template may have been causing the PDF problem.
Solution 4: Check the Print Spooler Service
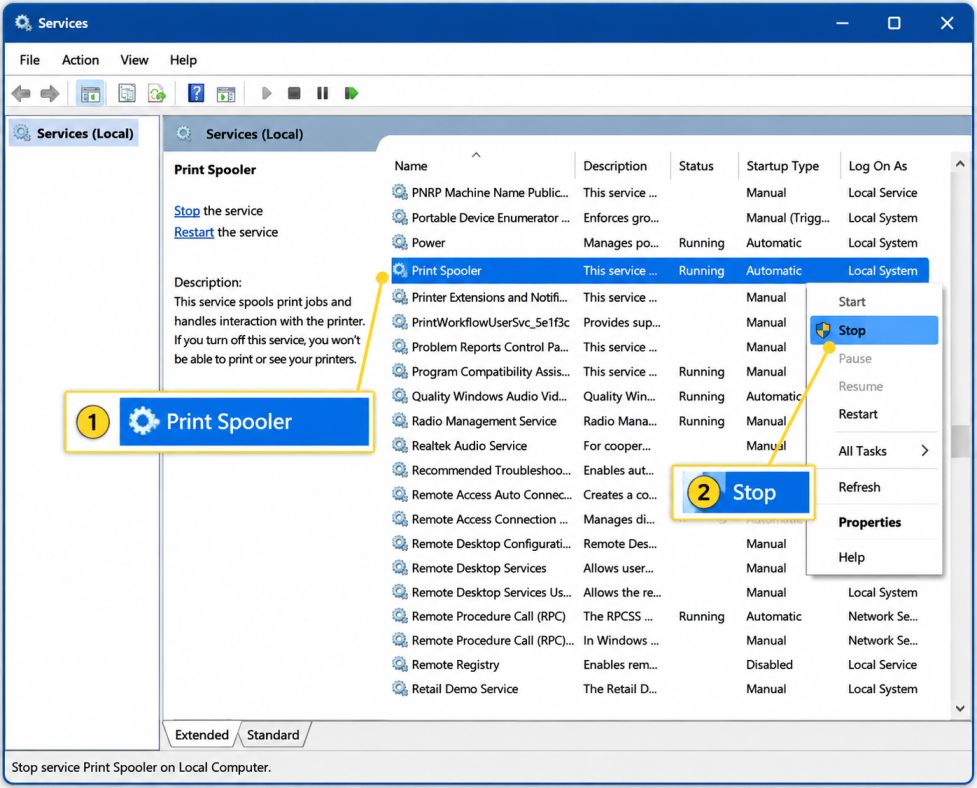
The Windows Print Spooler manages print jobs sent to your printer. If printing continues to fail, check that the service is running correctly.
- Press Windows + R.
- Type services.msc and press Enter.
- Find Print Spooler.
- Right-click it and select Properties.
- Set Startup type to Automatic.
- Select Apply, then Start.
- Try printing from QuickBooks Desktop again.
Solution 5: Fix the Reconcile Window Not Showing in QuickBooks
If the reconcile window disappears or does not appear after you select Reconcile, it may be hidden behind another QuickBooks window or positioned off-screen.
- Check all open QuickBooks windows to see if the reconcile window is hidden.
- Select Close All to close the open QuickBooks windows.
- Start the reconciliation process again.
- If the problem continues, the issue may require further troubleshooting for possible data damage or other QuickBooks errors.
Advanced XPS Document Writer Troubleshooting
If Microsoft XPS Document Writer still does not work after you have tried the basic QuickBooks PDF and printing fixes, the issue may be connected to Windows rather than QuickBooks itself. XPS printing depends on Windows features, permissions, and related components working correctly.
Instead of changing several settings at once, check each area separately. This makes it easier to identify what is actually causing the problem.
1. Check Windows XPS Features
Start by confirming that the Windows features required for XPS printing are available and enabled.
- Press Windows + R to open the Run dialog.
- Type optionalfeatures and press Enter.
- Review the available Windows features related to XPS and printing.
- If an XPS-related feature is disabled, enable it and allow Windows to complete the change.
- Restart your computer after making the change.
- Open QuickBooks Desktop and try creating or printing a PDF again.
If the required Windows component is missing, disabled, or not functioning correctly, QuickBooks may have difficulty creating PDF or XPS output even when your printer itself works normally.
2. Test Microsoft XPS Document Writer Outside QuickBooks
Testing XPS from another Windows application is one of the easiest ways to determine whether the problem is actually caused by QuickBooks.
- Open Notepad or another basic Windows application.
- Enter a small amount of text.
- Select Print and choose Microsoft XPS Document Writer.
- Try saving the resulting .xps file.
- Open the file after it has been created.
If Windows successfully creates an XPS file, the XPS component is generally working, and you can focus your troubleshooting on QuickBooks Desktop.
If Windows cannot create the XPS file outside QuickBooks, the problem is more likely related to Windows, the XPS component, permissions, or system configuration. Fixing that underlying issue should come before repeatedly repairing QuickBooks.
3. Review Windows Printing and User Permissions
Windows needs appropriate permissions to access printing components and create temporary or output files. On a personal computer, you may already have the required access. On a business computer, however, permissions can be restricted by an administrator.
Check the following:
- Make sure you are signed in with a Windows account that has the necessary permissions.
- Confirm that Windows can access the printer and its associated components.
- Check whether the problem occurs only with one Windows user account.
- If other users can print successfully, the issue may be specific to your Windows profile or permissions.
- Avoid changing system permissions randomly, as incorrect changes can create additional Windows problems.
If the computer is managed by your company, ask your IT administrator to review the permissions instead of modifying security policies yourself.
4. Check Security Software Carefully
Antivirus, endpoint protection, and firewall software can sometimes interfere with applications that create files or communicate with Windows printing services. This does not mean you should permanently disable your security software.
If you suspect security software is interfering:
- Check whether your security product has recently received an update.
- Review its blocked, quarantined, or restricted application activity.
- Look for entries related to QuickBooks, PDF creation, printing, or XPS files.
- Ask your IT administrator to determine whether a security policy is preventing QuickBooks from creating output files.
- If a temporary security test is necessary, have an administrator perform it safely and restore protection immediately afterward.
- Use an approved exception or policy change rather than leaving antivirus or firewall protection disabled.
This approach helps you troubleshoot the printing problem without creating an unnecessary security risk.
5. Check the Windows Print Spooler
The Print Spooler manages print jobs between Windows applications and printers. If the service is stopped or malfunctioning, QuickBooks may fail to print even when the printer appears to be connected.
You can check it by:
- Pressing Windows + R.
- Typing services.msc and pressing Enter.
- Finding Print Spooler in the list.
- Checking whether the service is running.
- If it is stopped, restart the service and test printing again.
- Try printing from another Windows application to confirm whether normal printing has returned.
If printing fails across multiple Windows applications, this is a strong indication that the problem is not limited to your QuickBooks company file.
6. Recheck the XPS Printer
Sometimes Microsoft XPS Document Writer may appear in Windows but still fail to process print jobs correctly.
Look for these signs:
- The XPS printer is missing from the available printer list.
- QuickBooks cannot select Microsoft XPS Document Writer.
- Windows accepts the print command but does not create an XPS file.
- An XPS file is created but cannot be opened.
- The problem occurs in QuickBooks and other Windows applications.
If several of these symptoms occur, concentrate on repairing the Windows printing/XPS environment before changing QuickBooks settings repeatedly.
7. When to Involve an IT Professional
Advanced Windows troubleshooting can affect system components, security policies, and other applications. If the basic steps do not resolve the problem, getting help from an IT professional is often the safer option.
Consider asking for professional assistance when:
- XPS printing fails outside QuickBooks.
- Windows features cannot be enabled or changed.
- Your Windows account has restricted permissions.
- The computer is managed by an organization.
- Security software is blocking QuickBooks or printing components.
- The Print Spooler repeatedly stops or fails.
- Microsoft XPS Document Writer is missing or cannot be restored normally.
- Other Windows applications are also experiencing printing problems.
The goal is not simply to make QuickBooks print once. You want the underlying Windows printing environment to work reliably so the same PDF or printing problem does not return the next time you print an invoice, report, check, or payroll form.
Fix General Printing Issues in QuickBooks Desktop
Before you make any major changes to QuickBooks or Windows, take a few minutes to check the basics. A printer that is offline, a stalled print queue, or an outdated driver can create what looks like a QuickBooks problem.
1. Test Printing Outside QuickBooks
Start by printing a simple document from Notepad or another Windows application. This quick test tells you whether Windows can communicate with the printer correctly.
- If the document does not print: the problem is likely related to Windows, the printer, its connection, the print queue, or the printer driver.
- If the document prints normally: the printer is working, so you can focus on QuickBooks settings and components.
This test is worth doing first because there is little value in changing QuickBooks settings when the printer itself cannot print from Windows.
2. Test Your Company File and QuickBooks Installation
If Windows printing works, the next step is to determine whether the problem affects QuickBooks generally or only your company file.
Try printing a standard QuickBooks form rather than a customized template. You can also print one transaction instead of sending a large batch to the printer.
For an additional check, open a QuickBooks sample company file and try printing the same type of document.
If printing works correctly in the sample company but fails in your regular company file, the problem may be related to your company data, a particular transaction, or a customized form. If printing fails in both, the issue is more likely related to QuickBooks or its printing configuration.
3. Rebuild the QBPrint.qbp File
If the QuickBooks Print & PDF Repair Tool does not resolve the problem, rebuilding the QuickBooks printer configuration can be the next step.
QuickBooks uses the QBPrint.qbp file to store printer setup information. If that configuration becomes damaged, renaming the file allows QuickBooks to create a fresh one.
Before starting, close QuickBooks Desktop.
- Locate the QBPrint.qbp file associated with your QuickBooks Desktop installation. The location can vary depending on your QuickBooks version and Windows setup.
- Right-click QBPrint.qbp and select Rename.
- Rename it to something such as QBPrint.qbp.old.
- Open QuickBooks Desktop again.
- Go to File > Printer Setup.
- Select the form you need to print and save the printer settings.
- Try printing again.
Renaming the file instead of deleting it gives you a backup of the previous configuration if you need to refer to it later.
4. Repair or Reinstall QuickBooks Desktop as a Last Resort
If the printer works in Windows, QuickBooks printing tools have not solved the problem, and rebuilding the printer configuration makes no difference, the QuickBooks installation itself may need attention.
Before reinstalling the program, consider using the available QuickBooks repair options and make sure your company files are backed up. Reinstallation should be treated as a later troubleshooting step, not the first solution for a printing problem.
If you do need to reinstall QuickBooks Desktop, follow Intuit’s current installation or clean-install instructions for your specific version. This can help replace damaged program components that may be preventing QuickBooks from communicating correctly with Windows printing and PDF components.
Final Thoughts
QuickBooks Desktop PDF and printing problems can usually be resolved by checking the printer, Windows settings, and QuickBooks components step by step. Start with the basic checks, then use the QuickBooks Print & PDF Repair Tool and troubleshoot XPS, permissions, templates, or printing services if needed.
By identifying where the problem occurs first, you can avoid unnecessary changes and focus on the solution that fits your specific QuickBooks printing or PDF issue.
Frequently Asked Questions
Your printer may not print from QuickBooks Desktop due to incorrect printer settings, outdated printer drivers, a paused print spooler service, or a damaged QuickBooks printer configuration file (QBPrint.qbp). Network printer connectivity issues or Windows permission restrictions can also prevent QuickBooks from sending print jobs. Always confirm that your printer works outside QuickBooks before troubleshooting within the software.
To change printer settings in QuickBooks Desktop:
1. Open QuickBooks Desktop.
2. Go to File > Printer Setup.
3. Select the form or report you want to print.
4. Choose the correct printer from the list.
5. Adjust paper size, orientation, and margins if needed.
6. Click OK to save changes.
This ensures QuickBooks uses the correct printer configuration for each transaction type.
QuickBooks uses your Windows default printer. To change it:
1. Open Control Panel > Devices and Printers.
2. Right-click the printer you want to use.
3. Select Set as default printer.
4. Restart QuickBooks Desktop.
Once updated, QuickBooks will automatically send print jobs to the new default printer unless overridden in Printer Setup.
To fix PDF and printing issues on Windows 10:
1. Update QuickBooks Desktop to the latest release
2. Run the QuickBooks Print & PDF Repair Tool
3. Restart the Print Spooler service
4. Verify Microsoft XPS Document Writer is enabled
5. Reset TEMP folder permissions
These steps resolve most PDF converter and printing errors in Windows 10 environments.
For QuickBooks Desktop 2021:
1. Use the QuickBooks Tool Hub to run the Print & PDF Repair Tool
2. Rename the QBPrint.qbp file to reset printer settings
3. Test printing from a sample company file
4. Reinstall the QuickBooks PDF Converter if needed
These fixes address version-specific conflicts and corrupted printer configuration files.
To fix printing and PDF problems in QuickBooks Desktop 2022:
1. Update QuickBooks to the latest release.
2. Run the Print & PDF Repair Tool from Tool Hub.
3. Ensure Microsoft XPS Document Writer is enabled.
4. Test printing outside QuickBooks (e.g., Notepad).
5. Restart Windows Print Spooler services.
If issues continue, reinstall QuickBooks Desktop to restore missing components.
To resolve missing PDF component errors in Windows 11:
1. Open Control Panel > Programs > Turn Windows features on or off.
2. Enable Microsoft XPS Document Writer.
3. Log in with Windows administrator credentials if prompted.
4. Restart your computer.
5. Run the QuickBooks Print & PDF Repair Tool.
This restores the core Windows services QuickBooks needs to create PDFs.
You can download the QuickBooks Print & PDF Repair Tool by installing the QuickBooks Tool Hub from Intuit’s official website. Once installed:
1. Open QuickBooks Tool Hub.
2. Select Program Problems.
3. Click QuickBooks Print & PDF Repair Tool.
This tool automatically detects and fixes common PDF and printing errors.
You may be unable to print invoices due to:
1. Incorrect printer selection in Printer Setup
2. Corrupted invoice templates
3. Damaged QBPrint.qbp file
4. Disabled Print Spooler service
5. Printer offline or driver issues
Try printing a standard invoice template or running the Print & PDF Repair Tool to restore invoice printing functionality.