QuickBooks Desktop is installed on your computer, while QuickBooks Online works in the cloud, giving you easier access from different devices. To move from Desktop to Online, first clean up and back up your company file, then choose the QuickBooks Online plan that fits your needs.
Sign in to QuickBooks Online and use the available migration option to transfer your company data. Before starting, check the current migration requirements and make sure your file is eligible. After the transfer, compare key reports such as Profit & Loss and Balance Sheet, then review settings, taxes, users, and permissions. Keep your original Desktop file for reference. Some Desktop features and data may not transfer exactly as they appear in Online, so reviewing your records after migration helps catch any differences early.
Why Move from QuickBooks Desktop to QuickBooks Online?
If you’re still using QuickBooks Desktop, moving to QuickBooks Online can make day-to-day accounting more flexible. You can access your books through a browser, collaborate with your accountant, and work from different locations without keeping the company file on one computer.
QuickBooks Online also handles updates through the online service, so you don’t have to manage the same type of Desktop installation and release updates yourself. However, Online and Desktop don’t have identical features, so you should compare the tools your business uses before making the switch.
Important Things to Know Before You Migrate to QBO
Before you migrate QuickBooks Desktop to QuickBooks Online, don’t treat the process as a simple file upload. The two platforms work differently, and some Desktop features may not transfer in exactly the same form.
- Keep a backup of the original Desktop company file.
- Update QuickBooks Desktop before starting.
- Review your customers, vendors, accounts, and transactions.
- Reconcile important bank and credit card accounts.
- Check payroll and inventory information.
- Save important reports for comparison.
- Confirm that the selected QuickBooks Online plan supports the features your business needs.
Taking these steps first can make it much easier to identify and fix anything that needs attention after the migration.
What Should Be Ready Before Starting the QuickBooks Migration?
Before you start the QuickBooks Desktop to QuickBooks Online migration, take a few minutes to prepare your company file. Having these items ready can help the transfer go more smoothly:
- An active QuickBooks Online account in the same country or region
- The latest supported version of QuickBooks Desktop
- Admin access to both QuickBooks Desktop and Online
- A company file within the applicable transaction-link limit
- A saved or printed Sales Tax Report
- Reconciled bank and credit card accounts
- Updated employee and payroll information, if payroll is used
- Any required setup or support for QuickBooks Time
To check your company file details, press F2 or Ctrl + 1 in QuickBooks Desktop. If the file is too large for the migration requirements, you may need to reduce or condense the data before continuing.
How to Migrate From QuickBooks Desktop to QuickBooks Online
Step 1: Get the QuickBooks Desktop File Ready
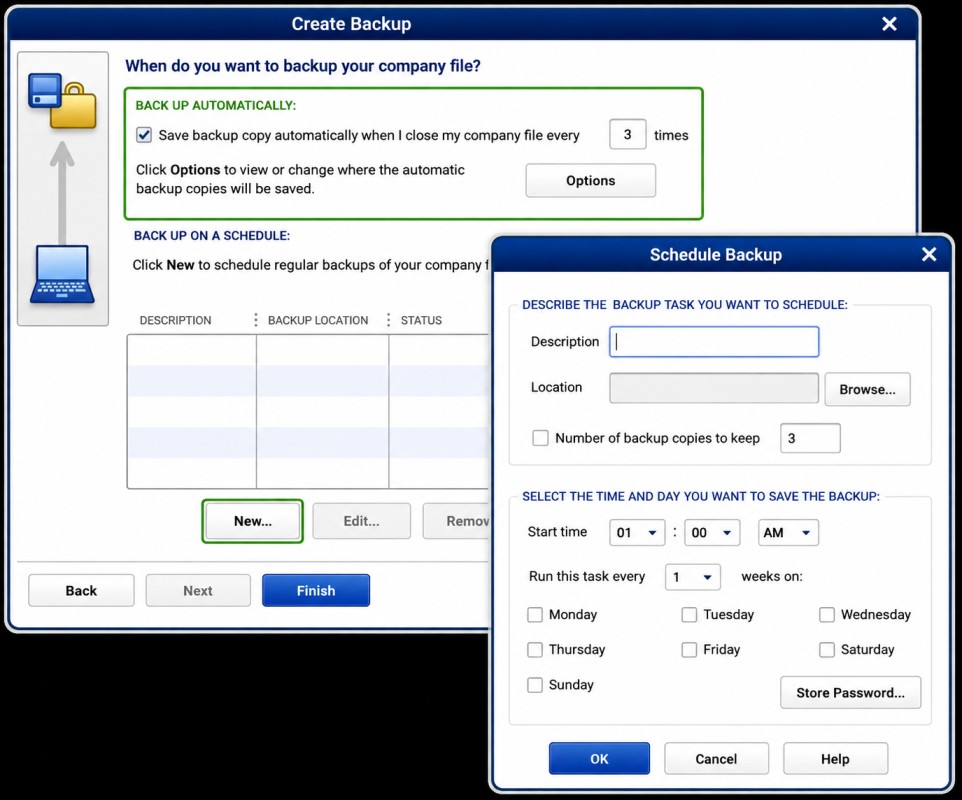
Before starting the migration, review your QuickBooks Desktop company file and make sure the records are accurate. Reconcile your accounts, clear pending transactions, and remove duplicate or unnecessary entries.
Run key reports such as Profit & Loss, Balance Sheet, Accounts Receivable, and Accounts Payable so you have something to compare after the move. Also, update QuickBooks Desktop and create a backup before continuing.
Step 2: Pick a QuickBooks Online Plan That Fits
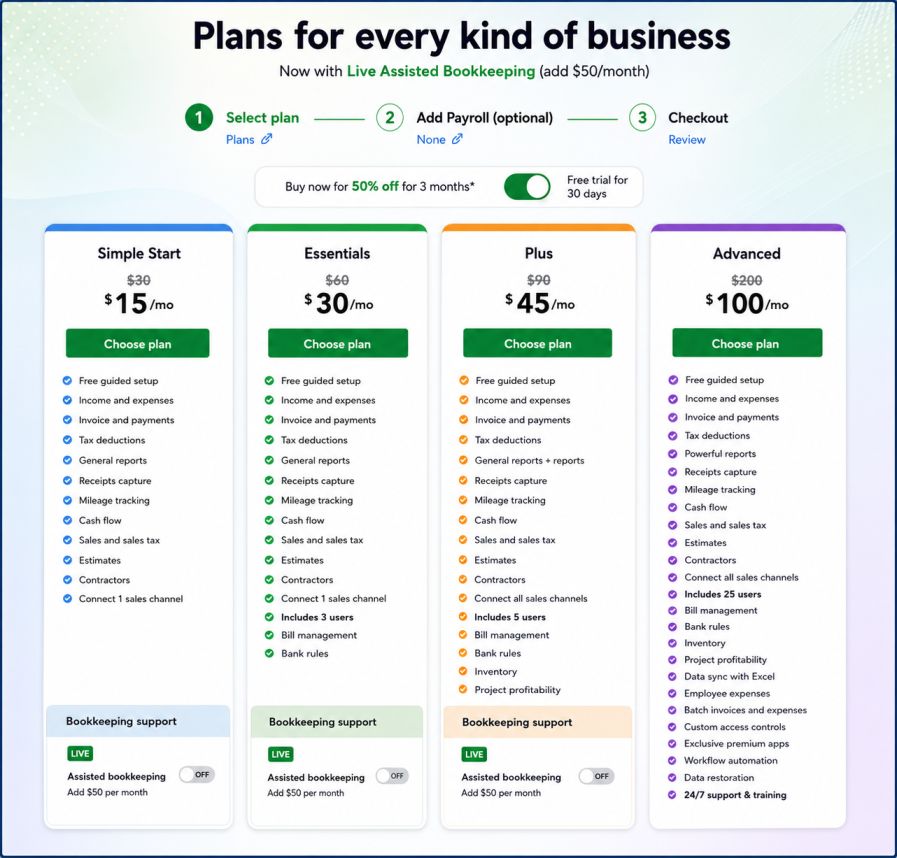
Choose the QuickBooks Online plan based on the features your business actually needs. The main options include Simple Start, Essentials, Plus, and Advanced.
Before choosing one, compare the features you currently use in Desktop, especially inventory, users, projects, and reporting.
Step 3: Set Up or Access the QuickBooks Online Account
If you don’t have QuickBooks Online yet, create an account and choose your plan. If you already use it, sign in to the correct company.
Double-check the Intuit account and destination company before you begin the migration.
Step 4: Begin the Desktop-to-Online Transfer
Open the QuickBooks Desktop company file and sign in with administrator access. From the Company menu, choose the available option for exporting or migrating the company to QuickBooks Online.
Follow the instructions shown on screen and sign in to your QuickBooks Online account when requested. For larger company files, review the current migration requirements before proceeding.
Step 5: Select the Information You Want to Move
Review the available migration choices and decide what should be transferred. Depending on your Desktop version and migration method, you may be able to move company data, lists, balances, and transactions.
Choose the option that suits your business and carefully review the included data before confirming.
Step 6: Review the Online Company Before Replacing Data
If you’re migrating into an existing QuickBooks Online company, pay close attention to any message about replacing existing information.
Check that you’ve selected the correct Online company and saved any important existing data. Only confirm the migration after reviewing what may be changed or replaced.
Step 7: Let QuickBooks Finish the Data Transfer
After starting the migration, allow QuickBooks to complete the process without making unnecessary changes to the company file.
The transfer time can vary based on the amount and complexity of your data. Follow the instructions provided when the migration finishes.
Step 8: Check Your QuickBooks Online Data After the Move
Once the migration is complete, review your Online company carefully. Compare important reports, including the Profit & Loss and Balance Sheet, with your Desktop records.
Also check customers, invoices, expenses, payroll, inventory, and account balances. If something doesn’t match, find the reason before using the Online data for regular bookkeeping.
Step 9: Fine-Tune Your QuickBooks Online Settings
After confirming the data, review your QuickBooks Online settings. Check tax settings, invoice preferences, chart of accounts, users, and permissions.
Because some Desktop features and workflows work differently Online, make any necessary adjustments before switching completely.
Step 10: Keep Your Desktop File Available for Reference
Don’t delete your QuickBooks Desktop company file immediately after the migration. Keep the original file and backup somewhere safe.
You can refer to them later when checking older transactions, comparing reports, or investigating differences. Before fully switching to Online, test your important accounting workflows to make sure everything is ready.
How to Migrate QuickBooks Desktop to Online Without Losing Data
The safest way to migrate QuickBooks Desktop to Online without losing data is to prepare the company file first and keep the original Desktop file as a reference.
Create a backup and save important reports before you begin. After the migration, compare the Online balances and reports with your Desktop records.
If you’re moving data into an existing QuickBooks Online company, check carefully for any warning about replacing existing information. Don’t confirm the migration until you’re sure the correct company is selected and important existing data is protected.
How Long Does QuickBooks Desktop to Online Migration Take?
There isn’t a single migration time that applies to every company.
A smaller company file with straightforward accounting data may require less time to process and review, while a company with extensive transactions, payroll, inventory, or other complex data may take longer.
The preparation and verification stages also add time. Even if the actual transfer finishes quickly, you should allow enough time to compare important reports and balances afterward.
What Happens to Payroll When Moving From QuickBooks Desktop to QuickBooks Online?
Payroll requires extra planning when you’re moving from QuickBooks Desktop Payroll to QuickBooks Online Payroll.
Before migration, review employee information, payroll records, tax information, and upcoming payroll dates. Avoid scheduling the migration immediately before an important payroll run.
After moving to Online, review the payroll setup before processing payroll again. Check employee details, pay rates, tax settings, payroll schedules, and other information that affects payroll processing.
What Happens to Inventory When Migrating QuickBooks Desktop to Online?
Inventory can require additional review because Desktop and Online may handle certain inventory features differently.
Before migration, record important inventory quantities and values. After the transfer, compare the Online inventory with your Desktop records.
Pay particular attention to:
- Product names
- Quantities on hand
- Inventory values
- Inventory accounts
- Cost information
- Sales and purchase transactions
If the inventory numbers don’t match, investigate the difference before using the Online figures for purchasing or financial reporting.
QuickBooks Desktop to Online Migration by Version
The migration process can vary depending on the QuickBooks Desktop edition and release you’re using. Always check the requirements for the specific version instead of following instructions meant for another edition.
- QuickBooks Pro to QuickBooks Online: If you’re moving from QuickBooks Pro to QuickBooks Online, prepare the company file, confirm that the version is supported, and review the features used in the Desktop company. Before choosing the Online plan, make sure it supports the business’s required features.
- QuickBooks Premier to QuickBooks Online: A QuickBooks Premier to QuickBooks Online migration follows the same general preparation process, but Premier users should review the specific features they currently rely on. If a Desktop feature doesn’t have an identical Online version, plan how that workflow will be handled after the move.
- QuickBooks Enterprise to QuickBooks Online: QuickBooks Enterprise to QuickBooks Online migration can require more planning because Enterprise companies often contain larger datasets and more advanced workflows. Review inventory, users, reports, payroll, custom fields, and other important Enterprise features before choosing the Online destination.
- QuickBooks Mac to QuickBooks Online: If you’re moving from QuickBooks Desktop for Mac to QuickBooks Online, the company file may require an additional conversion or compatible backup format before migration. Don’t assume that the Windows Desktop migration steps will work directly with a Mac company file.
- QuickBooks Desktop 2021 to QuickBooks Online: If you’re using QuickBooks Desktop 2021, check the current migration requirements for that specific release before starting. The available migration method can depend on the edition and the file format.
- QuickBooks Desktop 2022 to QuickBooks Online: For QuickBooks Desktop 2022, check that the software and company file meet the current requirements before using the migration option. Also review payroll, inventory, and other features before selecting the Online plan.
- QuickBooks Desktop 2023 to QuickBooks Online: If you’re moving QuickBooks Desktop 2023 to QuickBooks Online, update the Desktop software as required and confirm the migration option available for your edition.
Which QuickBooks Online Plan Should You Choose After Migration?
The right QuickBooks Online plan depends on the features your business actually needs. Don’t select a plan only because it sounds similar to your Desktop edition.
- QuickBooks Online Simple Start: Simple Start is designed for businesses that need core accounting features without the broader tools available in higher plans. Before choosing it, check whether the business needs multiple users, inventory, advanced reports, or other features that may require a different plan.
- QuickBooks Online Essentials: Essentials adds capabilities beyond Simple Start and can be a better fit for businesses that need additional users and features. Compare the features used in the Desktop company before choosing Essentials as the migration destination.
- QuickBooks Online Plus: QuickBooks Online Plus provides more advanced accounting capabilities and is commonly considered when a business needs features such as inventory and project-related functionality. If your Desktop company relies on inventory or similar features, compare the Online Plus capabilities before migrating.
- QuickBooks Online Advanced: QuickBooks Online Advanced is intended for businesses with more complex accounting and operational requirements. If you’re moving from QuickBooks Enterprise or another feature-heavy Desktop setup, compare the Enterprise workflows with Advanced before assuming that every feature will transfer in the same way.
How to Migrate QuickBooks Enterprise to QuickBooks Online
If you’re planning an Enterprise to Online migration, start by reviewing the size and complexity of the company file.
Before migrating, check:
- Company file size
- Inventory
- User permissions
- Payroll
- Custom fields
- Reports
- Sales tax
- Third-party integrations
- Enterprise-specific workflows
Then use the migration method supported by the Enterprise version being used. After migration, compare the important financial information and confirm that the Online setup supports the business’s day-to-day processes.
Common QuickBooks Desktop to Online Migration Problems and How to Fix Them
Migration problems can come from the company file, Desktop version, account access, unsupported features, or incorrect migration setup. Start by identifying the specific error rather than repeatedly restarting the migration.
- QuickBooks Desktop to Online Migration Failed: If the QuickBooks Desktop to Online migration failed, check the Desktop version, company file condition, administrator access, file size, and Online account. Make sure you’re using the migration method intended for your Desktop edition.
- Problems Converting QuickBooks Desktop to Online: Some problems happen because a Desktop feature doesn’t work the same way in QuickBooks Online. If a feature is important to the business, check how it works in Online before migrating. This can help prevent workflow problems after the transfer.
- Data Missing After QuickBooks Migration: If information appears to be missing after migration, compare the Online company with your original Desktop file and saved reports. Check whether the missing information is actually unsupported, still requires setup, or was affected by the migration method used.
- Inventory Data Not Matching After Migration: When inventory doesn’t match, compare quantities, values, products, and related transactions between the two systems. Don’t manually change large numbers of inventory records until the reason for the difference is understood.
- Payroll Migration Problems: If payroll information doesn’t look correct after migration, review employee details, tax information, payroll settings, and payroll history. Payroll problems should be addressed before the next payroll is processed.
- Company File Migration Errors: A company file error can prevent migration from completing. Check whether the file is supported, updated, accessible, and within the applicable migration limits. If the file itself appears damaged or has data integrity problems, resolve those issues before attempting another migration.
How to Verify Your Data After Moving to QuickBooks Online?
After moving QuickBooks Desktop to Online, compare the most important financial information rather than checking only whether the company opens.
Review:
- Balance Sheet
- Profit and Loss
- Accounts Receivable
- Accounts Payable
- Bank balances
- Credit card balances
- Inventory
- Customer balances
- Vendor balances
- Sales tax
- Payroll information
Run comparable reports in Desktop and Online where possible. If a number is different, find the reason before making manual adjustments.
What to Set Up After Moving From QuickBooks Desktop to QuickBooks Online
Your migration isn’t necessarily the end of the process. Some Online features need to be connected or configured after the data transfer.
- Reconnect Bank and Credit Card Accounts: Review your bank and credit card accounts after migration. If the feeds aren’t connected, reconnect them through QuickBooks Online. Before adding new feeds, check the existing transactions carefully to avoid creating duplicate entries.
- Review Company Settings: Check your company profile, accounting settings, fiscal year, invoice preferences, payment settings, and other important configurations. Some settings may work differently in Online, so review them before sending invoices or recording new transactions.
- Set Up Payroll: If payroll is part of the business, review the Online Payroll setup before processing the next payroll. Check employees, pay schedules, tax information, direct deposit settings, and payroll-related preferences.
- Set Up Sales Tax: Review the sales tax setup and make sure the correct tax agencies, rates, and settings are available. Compare important sales tax balances with the Desktop records before filing or making payments.
- Review Users and Permissions: Check every user who needs access to the Online company. Make sure each person has the appropriate role and doesn’t have unnecessary access to sensitive financial information.
- Review Reports and Account Balances: Finally, compare important reports and account balances with the original Desktop records. This is one of the most important post-migration checks because it can reveal problems that aren’t obvious from the company dashboard.
Can You Migrate QuickBooks Online Back to Desktop?
Moving from QuickBooks Online to Desktop is a separate process from Desktop-to-Online migration.
Not all Online features and data necessarily convert back to Desktop in exactly the same way. If you’re considering moving back, review the available conversion options and limitations first.
Don’t delete the Online company simply because the Desktop file has been created. Keep the original information available until the conversion has been fully reviewed.
Can You Migrate Sage 50 or Xero to QuickBooks Online?
Yes, businesses can move from other accounting platforms to QuickBooks, but Sage 50 to QuickBooks Online and Xero to QuickBooks Online are different from QuickBooks Desktop migration.
QuickBooks Desktop’s migration tool is designed for supported QuickBooks Desktop company files. Sage and Xero data require an appropriate conversion or import process.
Before starting, identify the information that needs to be retained, such as:
- Customers
- Vendors
- Chart of accounts
- Invoices
- Bills
- Payments
- Transactions
- Opening balances
- Historical records
The more complex the source data, the more important it is to plan the conversion before importing anything into the new QuickBooks Online company.
Move from QuickBooks Desktop for Mac to QuickBooks Online
Migrating from QuickBooks Desktop for Mac to QuickBooks Online is a smart move for businesses that want flexibility, real-time access, and modern cloud-based accounting. If you’re worried about losing data or starting from scratch, don’t be. With the right process, you can safely move your QuickBooks Desktop for Mac file to QuickBooks Online and continue managing your finances without disruption.
A. Why Move?
QuickBooks Online offers powerful advantages over the desktop version, especially for growing businesses and remote teams. When you migrate from QuickBooks Desktop for Mac to QuickBooks Online, you unlock features designed for speed, mobility, and collaboration. QuickBooks Online offers several advantages for Mac users:
- Automatic updates with no manual installations
- Cloud access from any device, anywhere
- Real-time collaboration with accountants and team members
- Mobile invoicing and expense tracking
- Secure data backup with advanced encryption
- Integration with third-party apps
By moving to QuickBooks Online, you future-proof your accounting system and eliminate the limitations of desktop-only software.
B. Important Things to Know Before Migrating (Mac)
Before you begin your QuickBooks Desktop for Mac to QuickBooks Online migration, review these essential requirements to avoid delays or errors.
- You can only move QuickBooks Desktop for Mac files to the US version of QuickBooks Online.
- If your company file contains more than 4,000,000 targets, you must condense the file before migrating.
- Existing data in QuickBooks Online will be replaced by your Desktop data during the move.
Preparing your file properly ensures a smooth and successful migration.
c. Move QB Desktop for Mac (2022 and Later) to QuickBooks Online
If you are using QuickBooks Desktop for Mac 2022 or newer, Intuit provides a built-in export tool that makes the migration straightforward.
- Sign in as the Admin
- Open your QuickBooks Desktop for Mac company file and sign in using the admin credentials.
- Start the Export Process
- Go to File > Export > To QuickBooks Online.
- You can also use the shortcut Shift + Command + D.
- Select “Get Started”
- This begins the guided export process.
- Choose What Data to Export
- Export all company data, or
- Export specific data only
If you use inventory, choose whether to include inventory during the migration.
- Sign In or Create a QuickBooks Online Account
- If you already have an account, select Yes, sign me in and enter your credentials.
- If not, choose No, I need to create a new one and follow the setup steps.
- Select the Destination Company
- Choose the QuickBooks Online company where your data will be transferred, then select Continue.
Once completed, your migration officially begins.
D. Benefits You’ll Notice After Switching to QuickBooks Online
After you move from QuickBooks Desktop for Mac to QuickBooks Online, daily accounting tasks become faster and more flexible. Top advantages after migration
- Send invoices and estimates on the go
- Track expenses in real time
- Receive mobile alerts and reminders
- Access financial reports instantly
- Collaborate easily with your accountant
QuickBooks Online adapts to modern business needs, making it easier to stay compliant and organized.
E. Migrate QuickBooks Desktop for Mac 2021 or Older Versions
If you are using QuickBooks Desktop for Mac 2021 or earlier, the process requires an extra step.
1. Migration Process for Older Versions
- Convert Your Mac File to Windows: Move your QuickBooks Desktop for Mac file to QuickBooks Desktop for Windows.
- Use the Online Migration Tool: From QuickBooks Desktop for Windows, use the online migration tool to transfer your data to QuickBooks Online.
2. Important Notes
- Files with more than 4,000,000 targets must be condensed.
- Migration confirmation emails may take up to 24 hours for older versions.
Although the process takes slightly longer, it remains secure and reliable.
3. Tips for a Smooth QuickBooks Migration
To avoid issues when moving from QuickBooks Desktop for Mac to QuickBooks Online, follow these best practices:
- Back up your company file before starting
- Clean up unused lists and old transactions
- Condense large files if necessary
- Perform the migration during non-business hours
- Review data immediately after completion
These steps reduce downtime and ensure data accuracy.
Move QuickBooks Desktop Files to QuickBooks Online Using the Accountant Batch Migration Tool
Migrating from QuickBooks Desktop to QuickBooks Online no longer has to be a time-consuming, high-risk process—especially for accounting professionals managing multiple client files. With the Accountant Batch Migration Tool, you can securely move up to 50 QuickBooks Desktop company files to QuickBooks Online in a structured, guided way. This powerful tool is designed to save time, reduce errors, and help firms modernize their accounting workflows efficiently.
A. Migration Tool
The Accountant Batch Migration Tool is a built-in feature within QuickBooks Desktop Accountant that allows accounting professionals to migrate multiple client company files to QuickBooks Online in one streamlined process. Instead of converting files one at a time, you can manage migrations from a centralized dashboard with real-time status updates.
This tool includes step-by-step instructions, automated file matching, and built-in validation checks to reduce the risk of failed conversions. For accountants handling multiple clients, it’s a major productivity upgrade.
B. Use the Batch Migration Tool?
Before you begin, it’s essential to confirm that you and your clients meet the eligibility requirements. The tool works only under specific conditions to ensure data integrity.
You can use the Accountant Batch Migration Tool if:
- You are using QuickBooks Desktop Accountant 2021 (R17), 2022 (R15), 2023 (R12), 2024 (R6), or newer
- Your clients use QuickBooks Desktop Pro, Premier, or QuickBooks Desktop for Mac
- Each client has 50 or fewer QuickBooks Payroll employees
- Company files are 5 GB or smaller and contain no more than 1,500,000 targets
- Desktop company files are stored locally, not in a hosted or cloud environment
- Payroll data exists only in Desktop and not already set up in QuickBooks Online
- You can sign in as the Primary Admin (All Access) for each company file
If any of these conditions are not met—such as larger payrolls or existing online payroll data—you’ll need to contact QuickBooks support or work with a migration expert.
Step 1: Prepare Client Files for Migration
Proper preparation is critical for a successful QuickBooks Desktop to QuickBooks Online conversion. Skipping this step can lead to errors, delays, or incomplete data transfers. Before migrating, make sure to:
- Update QuickBooks Desktop to the latest release
- Sign in as the Primary Admin (All Access) for each client file
- Review the pre-migration checklist to ensure file readiness
- Confirm that all connected services (such as payments) are accessible through the correct Intuit account
- Verify file size and target count by pressing F2 or Ctrl + 1
If your client uses QuickBooks Desktop Payments, ensure the QuickBooks Online admin has admin rights on the associated Intuit account.
Step 2: Add Desktop Company Files to the Migration List
Once your files are ready, you can begin building your migration list. Keep in mind that you have 60 days from the creation of a QuickBooks Online account to complete the data transfer. To add files:
- Open QuickBooks Desktop Accountant or QuickBooks Enterprise Accountant
- Sign in to the client file as Company Admin
- Navigate to Company > Migrate Multiple Company Files to QuickBooks Online
- Enterprise users can press Ctrl + Q + M
- Enter the owner’s email address if prompted
- Follow the on-screen instructions or watch the demo video
- Select Add to include the current company file
- Repeat the process to add additional client files
- Once finished, select Open Migration Dashboard
- Sign in using the Intuit account linked to the QuickBooks Online subscription
Each file must be added individually and authenticated by an admin.
Step 3: Migrate Files from the Migration Dashboard
The Migration Dashboard is your control center. From here, you can monitor progress, resolve errors, and manage multiple migrations at once.
A. Key Migration Dashboard Features
- Automatically uploads all added company files
- Matches Desktop files to existing QuickBooks Online companies
- Displays company name and last four digits of the online company ID
- Allows manual matching or creation of a new 30-day QuickBooks Online Advanced trial
B. Default Migration Settings
By default, the tool applies the following preferences:
- Inventory: Not migrated
- Multi-currency: USD (U.S. Dollar)
You can edit these settings for individual files or apply changes in bulk using batch actions.
C. Starting the Migration
- Select Migrate Selected Files
- All files marked Ready to Migrate will be included
- Files that fail validation will be automatically excluded
- If QuickBooks Online already contains data, you must approve its replacement
Once migration starts, each file displays a real-time progress bar. You can safely close the dashboard—your data remains secure, and progress continues in the background.
D. Migration Status and Troubleshooting
After completion, the status updates to Migrated Successfully, and confirmation emails are sent to both you and the client’s Primary Admin. If a migration fails:
- Review the error status in the dashboard
- Remap the company file if necessary
- Contact QuickBooks support or a migration expert for assistance
All uploaded files remain in the Migration Dashboard for 7 days, after which they are automatically purged. You can also delete files manually at any time.
Step 4: Prepare Clients to Use QuickBooks Online
Migration is only the beginning. Once the data is live in QuickBooks Online, it’s important to validate accuracy and set clients up for success.
After migration:
- Review migration confirmation emails
- Verify balances, lists, and reports
- Use a post-migration checklist to confirm data integrity
- Configure settings, users, and workflows in QuickBooks Online
- Train clients on new features and cloud-based tools
This final step ensures your clients gain maximum value from their move to QuickBooks Online.
Why Accountants Choose Batch Migration?
The Accountant Batch Migration Tool offers significant advantages:
- Saves time by migrating multiple files at once
- Reduces manual errors with automated validation
- Centralizes control through one dashboard
- Supports firm-wide transitions to cloud accounting
- Enhances client satisfaction with smoother conversions
For accounting professionals looking to scale efficiently, this tool is a game-changer.
Final Thoughts
Moving your QuickBooks Desktop file to QuickBooks Online is more than a technical upgrade—it’s a strategic decision. With cloud access, real-time collaboration, and modern automation tools, QuickBooks Online helps businesses stay agile and organized.
By preparing properly, following the correct migration steps, and completing post-migration setup, you can transition smoothly and start enjoying the full benefits of cloud-based accounting. If you want flexibility, scalability, and peace of mind, QuickBooks Online is a powerful next step for your business.
Frequently Asked Questions
1. After migration, verify data integrity by comparing key reports (Balance Sheet, Profit & Loss, A/R and A/P Aging) in both systems.
2. Use Verify and Rebuild utilities on the Desktop file before migrating to minimize corruption risk.
3. If corruption appears post-migration, export key lists and transactions manually and re-import or correct them in QBO.
1. In older QuickBooks Desktop versions, attachments aren’t always transferred automatically (some users report missing attachments).
2. QuickBooks Support describes steps to export and upload attachments manually using QBO upload areas or bulk .zip files:
– In Desktop, create an attachment zip of your files.
– In QuickBooks Online, use the Attachments report and upload area to drag-and-drop or browse files.
3. Alternatively, some third-party tools (e.g., Zed Axis) let you bulk export and import attachments by mapping them to transactions.
1. Payroll setup isn’t fully migrated automatically; QuickBooks Online Payroll has a different system structure.
2. Before migrating: finalize payroll runs, deactivate old employees, and wait a few days so data can sync.
3. After migrating the company file, set up Online Payroll and manually validate employee year-to-date amounts and settings in QBO.
1. QuickBooks offers an Amazon Marketplace Connector for QBO that lets you connect your Amazon Seller account and import sales, fees, tax, etc.
2. Steps:
– When prompted in QBO, select Get started for the Amazon integration.
– Log in with your Amazon credentials and authorize access.
– Choose data import options and start importing transactions.
3. Once connected, you’ll see imported Amazon transactions under App Transactions and can review before adding to your books.
Note: For enhanced automation (e.g., full reconciliation, VAT handling), third-party tools like Webgility or Link My Books are commonly used.
1. Prepare the Desktop File – update QuickBooks, reconcile accounts, condense data if large.
2. Check File Size/Links – QBO has limits; heavy files may need condensing or Lists & Balances migration.
3. Use the Migration Tool (Desktop or web-based) – sign in to QBO, choose export options, and complete the move.
4. Finalize in QBO – reconnect bank feeds, payroll, payment services, and integrations.
1. Most core data (customers, vendors, accounts, transactions) migrates, but some items don’t transfer automatically:
– Audit trails, recurring templates, user permissions
– Some payroll history
– Custom reports and saved forms.
2. Inventory valuation may require adjustments due to differences (e.g., FIFO vs. average cost).
3. Post-migration setup ensures that integrations and bank feeds work properly.
1. Common errors (e.g., “file too large,” employee conflicts, export issues) have specific fixes:
– Reduce file size by condensing or selecting Lists & Balances only.
– Ensure you’re an admin and complete QBO setup before export.
– Copy files to local drives, use single-user mode, and update QuickBooks Desktop.
2. If errors persist, consider manual CSV export/import or contacting support.
Pros: Remote access, auto-updates, real-time collaboration, extensive integrations.
Cons: Migration limitations, potential data differences, some features change in QBO.
Evaluate client needs and file size/complexity first. Some firms prefer importing only recent years and retaining old Desktop files for historical reporting.
1. Use the Condense Data utility in QuickBooks Desktop to reduce total data size by removing older transactions.
2. Condensing reduces targets (linked data points) to meet QBO limits.
3. Always backup before condensing, and verify accuracy post-condense.
1. If the file is too large for full migration, choose a Lists & Balances migration during the QBO migration setup.
2. This imports chart of accounts, customers/vendors, opening balances, and excludes older transactions.
3. Afterward, manually enter key transactions or carry forward beginning balances in QBO.
1. QuickBooks Desktop for Mac does not directly export to Windows format.
2. Use Intuit’s conversion service or ProAdvisor assistance to convert Mac files, or intermediate export via Windows file conversion tools offered by Intuit. (Not always full-featured, especially for older versions.)
1. Ensure the system and file meet migration requirements (latest QuickBooks Desktop version, compatible OS).
2. Create fresh backups, close QuickBooks, and try updating & rebuilding the file.
3. If automatic migration repeatedly fails, consider manual export/import methods, or reach out to QuickBooks support.